Friday, May 10

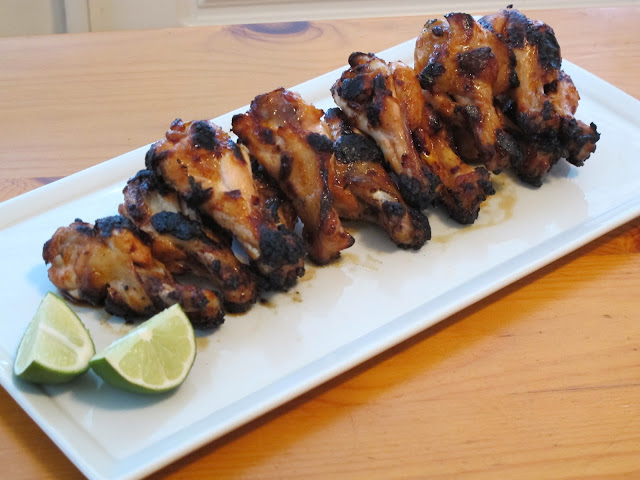
Grilled Honey-Lime-Sriracha Wings


It's nearly summer here in L.A. and we've been firing up the grill at our house. These wings are the perfect thing for a casual dinner on a warm evening or for a backyard barbecue. Dump all the ingredients for the marinade in a bag, add in the chicken, and forget about them. When you're ready to eat, just toss them on the grill until they get nice and charred and then pile them onto a platter. The sticky spicy-sweet sauce turns into a light glaze on the wings and adds tons of flavor. They'll be a huge hit with all your family and friends.


Grilled Honey-Lime-Sriracha Wings:
  • Whisk together the juice of 2 limes, 4 tbsp. Sriracha hot sauce, 3 tbsp. honey, 3 tbsp. canola oil, and 2 minced garlic cloves in a bowl.
  • Season 1 1/2 lb. chicken wings* with salt and place in a large resealable bag.
  • Pour in the marinade and massage into the wings. Seal the bag, squeezing out any excess air.
  • Marinate wings in the fridge for at least 4 hours or overnight.
  • Thirty minutes before you're ready to cook, heat your grill to high and take the wings out of the fridge.
  • Grill wings for 7-8 minutes, then flip and cook for another 7-8 minutes, or until charred in some places and cooked through.
  • Let rest for a few minutes, then dig in.

Serves two (entree)
Serves four (appetizer)
*I like to use the drummettes only since they have more meat.
Thursday, May 9

Breakfast Tacos


I'm a huge fan of Mexican food for breakfast (like these huevos rancheros or chilaquiles) and recently threw together some breakfast tacos with ingredients I had around the house. The nice thing about this dish is it can really be customized to whatever you have on hand or personal preference. This version has crispy bacon, a spicy potato and pepper filling, and scrambled eggs. You could easily make these vegetarian by omitting the pork and adding avocado or black beans. It's also a fun brunch dish - just set out all the toppings and let guests customize theirs with a make-your-own breakfast taco bar.


Breakfast Tacos:
  • Place 2 Yukon Gold potatoes into a pot of cold water, bring to a boil, and cook for 20-30 minutes, or until tender.
  • Drain potatoes, let cool slightly, and dice into cubes.*
  • Meanwhile, dice 4 slices of bacon and cook in a hot skillet until crispy and fat has rendered, about 5 minutes.
  • Remove bacon and keep fat in the pan.
  • Add in 1 diced onion, 1 diced bell pepper, 1 diced jalapeno, a pinch of salt, and pepper
  • Cook over medium heat for 7-10 minutes, or until soft and translucent.
  • Increase the heat to high and add in the diced potato. Cook, without turning, for 5 minutes, or until brown.
  • Flip and cook potatoes for a few more minutes, or until crispy.
  • Meanwhile, heat 1 tbsp. butter in a pan and scramble 3 eggs until your desired doneness.
  • To assemble, sprinkle warm tortillas with some grated Monterey Jack cheese, spoon over some of the scrambled eggs and some of the potato mixture, and top with some of the bacon.
  • Serve with salsa or hot sauce and enjoy.

Serves two-three
*Can be done a day in advance, cooled, and kept in the fridge.

Wednesday, May 8

Crispy Roasted Baby Artichokes


One of the farmers markets I go to has beautiful baby purple artichokes (seen here) and I usually can't resist buying a basket or two. I was thrilled when I saw April Bloomfield's recipe for crispy pan roasted baby artichokes in last month's Bon Appetit and it did not disappoint. You do need to trim and peel a fair amount of the leaves and tough outer stem off of the artichokes, so buy more than you think you'll need to start off. The prep goes pretty quickly (especially if you can convince your fiance to help you out and create an assembly line) and is so worth the effort. Enjoy the artichokes as a simple side dish, or toss with some more herbs and burrata for a lovely salad.


Crispy Roasted Baby Artichokes:
  • Tear all of the tough outer leaves off of 2 lbs. of baby artichokes and slice off their tops.
  • Trim the ends off of the stems, leaving as much stem as possible, and use a knife to scrape off the stems tough outer layer.
  • Place finished artichokes in a bowl of cold water that has the juice of 1 lemon in it.*
  • Drain artichokes, stem side up, on paper towels for a few minutes.
  • Meanwhile, heat 3 tbsp. olive oil in a small heavy pot.
  • Add the artichokes, stem side up, in one layer in the pot and sprinkle with salt.
  • Scatter 3 thinly sliced garlic cloves on top and cook for 3-4 minutes, or until brown.
  • Add in 1/2 c. white wine, reduce to a simmer, and cover the pot with a lid.
  • Cook for 20 minutes, or until artichokes are tender, then uncover the lid and allow the remaining wine to evaporate.
  • Sprinkle with 2 tbsp. chopped fresh parsley and serve.

Serves three-four (side dish)
*The lemon will keep the artichokes from browning.

Tuesday, May 7

Roast Chicken with Cilantro Chimichurri


A lot of my recipes call for some sort of fresh herbs, and I usually have a bunch laying around at the end of the week. I've been trying to be mindful of waste, so I decided to re-purpose them into a quick chimichurri sauce (salsa verde and pesto would be great too). The sauce is full of bright, bold flavors and can jazz up any meal. I paired it with simple roasted chicken breasts for an easy, healthy weeknight meal. Leftover chimichurri can be covered and stored in the fridge for several days.


Related Recipes:
- Grilled Chicken with Salsa Verde
- Simple Roasted Chicken
- Grilled Skirt Steak with Salsa Verde


Roast Chicken with Cilantro Chimichurri:
  • Preheat the oven to 400F.
  • Season 2 bone-in, skin-on chicken breasts with salt and pepper and rub with a little bit of olive oil.
  • Place chicken on a baking sheet, skin-side up, and roast in the oven for 35-45 minutes, or until skin is crispy and meat is cooked through.*
  • Meanwhile, combine 1/3 c. fresh cilantro leaves, 1/4 c. fresh oregano leaves, 1 garlic clove, 1/2 tsp. red chili flakes, 2 tbsp. red wine vinegar, and a large pinch of salt in a blender or food processor.
  • Puree mixture and slowly stream in 1/4 c. olive oil until the mixture is smooth.
  • Check for seasonings and adjust as necessary.**
  • Let chicken cool slightly, then divide onto plates and drizzle chimichurri sauce on top. Serve extra sauce alongside.

Serves two
*Juices should run clear when chicken is pierced with a knife.
**Sauce with keep covered in the fridge for several days.

Monday, May 6

Fettuccine with Peas & Garlic Alfredo Sauce


Since I had so much success with these black beans, I decided that I’d try conquering another food I’ve historically disliked: peas. To be fair, I first reintroduced myself to them with a delicious fresh pea agnolotti from Spago a couple weeks ago and was determined to make something I’d like with them at home. Spring is the ideal time to get reacquainted with this veggie, since the farmers market is filled with fresh English peas (I can buy them already shucked from their pod at my local market, which is a huge convenience). Determined to keep them from turning mushy and wrinkly (which is how my distaste for them must have started), I ended up actually under-cooking them quite a bit and have adjusted the recipe so that the same thing won’t happen to you. The alfredo sauce makes up for everything though, as it coats the noodles and peas with a delicious silky garlicky cream sauce that’s reminiscent of your favorite Italian restaurant.


Fettuccine with Peas & Garlic Alfredo Sauce:
  • Bring a large pot of water to a boil, season with salt, and cook 1/2 lb. fettuccine pasta until al dente.
  • In the last 5-6 minutes of cooking, add 2 c. shelled English peas to same boiling pot of water that the pasta is in.*
  • Meanwhile, melt 3 tbsp. butter in a skillet over medium heat.
  • Add in 2 heads of minced spring garlic** and cook for 2-3 minutes, or until fragrant but not brown.
  • Stir in 1 c. heavy cream, a large pinch of salt and pepper, and reduce the heat to low.
  • Drain the pasta and peas and add to the alfredo sauce.***
  • Toss the pasta with the sauce and stir in 1/3 c. grated Parmesan cheese, 1 tbsp. minced chives, and 1 tbsp. minced parsley.
  • Continue to toss for 1-2 minutes, or until most of the sauce is absorbed and thickened.
  • Divide onto plates and serve.

Serves two-four
*You can also add in 2 c. of defrosted frozen peas, but just toss them in with the sauce and pasta at the end, do not add to boiling water.
**Or 3-4 cloves of regular garlic.
***It's ok if a little pasta water clings to the sauce, it helps the pasta thicken.

Thursday, May 2

Butter Lettuce, Radish, & Gorgonzola Salad


This is the latest simple green salad that’s been showing up a few nights a week on my dinner table. It’s a five minute side dish that sings of Spring flavors and colors. I like the contrast of using two lettuces – the delicate and soft butter lettuce and peppery arugula – which I’ve been buying in the serve yourself bins at my farmers market. The crunchy radishes add a nice texture and flavor and can be sliced a few days ahead and kept in a plastic bag for even faster assembly. I’m a huge fan of blue cheese and creamy gorgonzola, but you could substitute some wide shavings of Parmesan or anything else you have on hand. I like my dressing on the acidic side, but feel free to add a little more olive oil if you find it too harsh. 


Butter Lettuce, Radish, & Gorgonzola Salad:
For Dressing
  • Finely mince 1 small shallot and place into a small bowl with 1 tsp. Dijon mustard and 2 tbsp. red wine vinegar.
  • Whisk until smooth and season with salt and pepper.
  • Right before dressing your salad, stream in 3 tbsp. extra virgin olive oil until emulsified.
For Salad
  • Tear the leaves from 1 head of butter lettuce into bite-size pieces.
  • Place lettuce in a big bowl with 2 c. loosely-packed arugula, 4 thinly sliced radishes, and 3 oz. crumbled gorgonzola cheese.
  • Season with salt and pepper and toss with the dressing.
  • Serve immediately.

Serves four (side dish)

Wednesday, May 1

Bean, Cheese, & Egg Tostadas


Now that I like black beans, I’m able to enjoy their benefits of being one of the cheapest dishes to make. This recipe couldn’t be easier as it’s made entirely of ingredients I usually keep around  the house – tortillas, cheese, eggs – and leftover beans from a big pot I made last weekend. While simple, the flavors and textures are still exciting from the crispy fried tostadas, runny egg yolk, and hearty black beans. I serve a few garnishes that really pack a punch and elevate the dish: toasted cumin oil, sliced avocado, quick-pickled red onion, and fresh cilantro. It’s a quick and cheap meal at its finest.


Bean, Cheese, & Egg Tostadas:
  • Heat 1/2" of canola oil in a heavy skillet under very hot but not smoking.
  • Add in a corn tortilla and cook for 2 minutes a side, turning once, or until puffed, crispy, and golden brown.
  • Set tostada on a paper towel to drain, sprinkle with salt, and repeat with 3 more corn tortillas.*
  • Sprinkle each tostada with grated monterey jack cheese and melt in a 375F oven for 3-4 minutes.
  • Meanwhile, heat 1 tbsp. olive oil and 1 tsp. cumin seeds in a skillet until cumin is toasted, about 2-3 minutes.
  • Pour out the cumin oil into a bowl and place back on the stove.**
  • Crack in 4 eggs and fry until whites are set and yolks are still runny. Season with salt and pepper.
  • To assemble, spoon warm black beans*** on top of each cheesy tostada, top with a fried egg, and drizzle with reserved cumin oil.
  • Serve with avocado, pickled red onions, fresh cilantro, hot sauce, etc.

Serves two-four
*I like to keep tortillas on a baking rack over a baking sheet in a hot oven while they're waiting to be assembled. Can be made and stored in the oven an hour before serving.
**Leave a little oil in the pan to fry the eggs with.
***I used leftover beans from this recipe. You can use any cooked, drained beans that you like.