Showing posts with label quick weeknight meal. Show all posts

Tuesday, September 22

Huevos Rancheros Verdes

Tortillas stacked with beans, eggs, and cheese, and smothered with salsa verde

Huevos Rancheros with Salsa Verde


We were in San Diego a few weeks ago to celebrate my birthday and ate a lot of delicious food while we were down there. One meal that stood out was the huevos rancheros I had for brunch at Prepkitchen in La Jolla.  These huevos rancheros were unique for two reasons: they were stacked and layered like a cake, and they had a green tomatillo sauce instead of a red sauce. The layered effect made it so every bite had a bit of beans, eggs, cheese, salsa, tortilla, and avocado - basically every bite was a perfect mouthful. I recreated the dish at home using a few shortcuts (store-bought salsa verde and a fast version of refried black beans) that make this a great recipe for a weeknight dinner or for a casual weekend breakfast. Feel free to customize the toppings and layers at you like - or prep all the ingredients and let each person assemble their own. This is an easy recipe to double or triple.


Related Recipes:
- Chorizo Huevos Rancheros
- Chilaquiles
- Black Bean Huevos Rancheros


Huevos Rancheros Verdes:
Ingredients
- 4 corn tortillas
- 14 oz. can of black beans, drained and rinsed*
- 1 c. salsa verde
- 3/4 c. grated Monterey Jack cheese
- 4 eggs, scrambled
- splash of milk
- 1/2 tsp. ground cumin
- 1/4 tsp. chile powder
- 1 avocado, thinly sliced
- canola oil
- salt
- pepper
- sour cream, hot sauce, fresh cilantro (for garnish)

Recipe
  • Preheat the oven to 400F.
  • Brush both sides of the tortillas with canola oil and lay in a single layer (slight overlap is ok) on a baking sheet.
  • Cook the tortillas for 5-7 minutes in the oven, or until crispy. Remove and let cool a bit.
  • Meanwhile, add the beans, 1/4 c. water, cumin, chile powder, and a big pinch of salt to a small pot and bring to a boil. Lower to a simmer and cook for 5 minutes, then mash with a potato masher to form a spreadable consistency. Continue simmering until it reaches the desired consistency, adding a splash more water if needed.
  • Whisk the eggs, milk, and a pinch of salt and pepper together.
  • Heat a little more canola oil in a skillet and scramble the eggs. Slightly undercook them as they will be going in the oven.
  • To assemble the huevos, add a little bit of salsa verde to the bottom of 2 small baking dishes.
  • Spread the beans on 2 crispy tortillas, then lay them in each baking dish. Top each with another tortilla and divide the eggs and then the cheese on top. Pour the remaining salsa on top.
  • Bake for 5-7 minutes, or until the cheese melts.
  • Add a dollop of sour cream, sliced avocado, and cilantro on top of each dish. Serve with hot sauce.

Serves two, generously
*Or cook your own beans, add in some of the bean cooking liquid, and skip the water and additional seasonings.

Wednesday, September 16

Zucchini Ribbon Spaghetti

Thinly shaved zucchini and spaghetti with lots of garlic and crunchy breadcrumbs


This dish is a late summer's take on this romanesco pasta. Super thin slices of zucchini are sautéed in a garlicky aglio olio sauce and tossed with spaghetti. The ratio I like is about half zucchini and half pasta with a good handful of toasted breadcrumbs on top. I don't own a spiralizer and haven't quite jumped on the bandwagon where vegetable "noodles" are an acceptable substitute for real pasta, but this dish is a good compromise between the two. You can use a wide vegetable peeler or mandoline to shave the zucchini into thin slices (or if you do have a spiralizer, this is the time to use it). This is a simple weeknight meal, but the addition of toasted breadcrumbs and fresh basil add texture and flavor to make it feel special. Leftovers manage to taste even better once reheated - just keep the breadcrumbs separate or they will get mushy.


Related Recipes:
- Spaghetti with Asparagus & Poached Egg
- Couscous with Zucchini & Feta
- Whole Wheat Pasta with Grated Zucchini


Zucchini Ribbon Spaghetti with Toasted Breadcrumbs:
Ingredients
- 4 large zucchini, sliced lengthwise into 1/8" ribbons, then cut in half lengthwise
- 1/2 lb. spaghetti
- 1/2 c. fresh breadcrumbs or panko
- 1/4 c. grated parmesan cheese
- large handful of fresh basil leaves, cut into ribbons
- 2 anchovy fillets
- 4 cloves garlic, peeled and very thinly sliced
- 5 tbsp. olive oil
- pinch of red chile flakes
- kosher salt

Recipe
  • Bring a large pot of water to a boil and season generously with salt.
  • Meanwhile, add 2 tbsp. olive oil to a small skillet over medium heat.
  • Add in the breadcrumbs and a pinch of salt to the skillet and toast, stirring occasionally, for about 5 minutes, or until crunchy and golden. Set aside.
  • Add in the pasta to the water and cook until al dente, about 1 minute before the recommended time on the package.
  • While the pasta is cooking, heat the remaining olive oil with the garlic, anchovies, and red chile flakes in a large pan over medium heat.
  • Cook for 2 minutes, or until the garlic is fragrant and the anchovies have melted, then add in the zucchini and a big pinch of salt. Cook for 4-5 minutes, or until the zucchini is tender.
  • Drain the pasta, reserving 1/3 c. pasta cooking liquid and add the pasta and some of the pasta water to the pan with the zucchini.
  • Add the basil and parmesan and toss everything to combine. Check for seasoning.
  • Divide pasta onto plates and top with breadcrumbs.

Serves four

Wednesday, July 22

Orecchiette with Italian Sausage & Cherry Tomatoes

A quick weeknight pasta with crumbled sausage and fresh tomatoes


Pasta with Sausage and Tomatoes


One of my favorite simple meals to make in the summer is pasta tossed with fresh cherry or grape tomatoes. It's so easy, but when the pasta is cooked perfectly al dente and the tomatoes are sweet and juicy, it tastes just like you're sitting down for dinner in Italy. I've been subjecting my husband to a lot of vegetarian meals lately, so I added in some crumbled Italian sausage to this recipe to give him some meat. Combined with lightly-cooked tomatoes and garlic, this forms the entire "sauce" for the pasta. One important tip is that for a pasta with so few ingredients, make sure that you are really salting your boiling water before cooking pasta. If in doubt, taste a spoonful of water before adding the orecchiette - it should taste salty. Most people don't add enough salt and then the pasta doesn't have any flavor to it.


Related Recipes:
- Sausage & Cherry Tomato Bake
- Pesto Pasta with Tomatoes, Burrata, & Breadcrumbs
- Spaghetti with Chunky Cherry Tomato Sauce


Orecchiette with Italian Sausage & Cherry Tomatoes:
Ingredients
- 1 lb. orecchiette or similar shaped pasta
- 3/4 lb. fresh Italian sausage, casings removed
- 2 pints cherry or grape tomatoes
- 1/4 c. grated parmesan
- 2 garlic cloves, minced
- 2 tbsp. olive oil
- handful of fresh basil, sliced into ribbons
- pinch of red chile flakes
- kosher salt
- black pepper

Recipe
  • Bring a large pot of water to a boil.
  • Meanwhile, heat the olive oil in a large skillet over medium-high heat and add the sausage. Let the sausage brown and cook through, breaking up the sausage with the back of a spoon as it cooks.
  • Once the water is boiling, add a few large pinches of salt and the pasta. Cook according to package directions for al dente.
  • Remove the sausage from the pan with a slotted spoon, leaving the fat in the pan. Add the tomatoes, chile flakes, and a pinch of salt and pepper.
  • Lower the heat to medium-low and add the garlic. Cook for 7-10 minutes, stirring occasionally and lightly pressing on the tomatoes with a wooden spoon to break them up a bit. The tomatoes should be soft but should still hold most of their shape.
  • Drain the pasta, reserving 1/4 c. pasta cooking water.
  • Add the sausage back to the pot with the tomatoes, along with the pasta, pasta water, and parmesan.
  • Stir everything together until well mixed and check for seasoning. Just before serving, sprinkle with basil.

Serves four-six

Tuesday, July 14

Grilled Scallops with Bacon-Scallion Relish

Sweet, meaty grilled scallops with smokey bacon relish


Bobby Flay's Grilled Sea Scallops with Green Onion Relish and Warm Bacon Vinaigrette


Like shrimp, scallops are a relatively easy and quick-cooking seafood to make on the grill. This recipe from Bobby Flay calls for simply grilling scallops with a little oil, salt, and pepper, and then topping them with a tasty sauce and relish made from bacon and scallions. The combination of sweet, succulent scallops and salty, fatty bacon are a perfect pairing. The addition of vinegar and raw scallions cuts through the richness and keep it from feeling too heavy. This is one of those dishes that only takes about twenty minutes but is fancy enough for a special occasion.


Related Recipes:
- Sticky Asian Scallops
Jalapeño Corn Soup with Seared Scallops
- Lobster, Corn, & Bacon Chowder


Grilled Scallops with Bacon-Scallion Relish:
Ingredients
- 1/2 lb. large sea scallops, preferably dry-packed, side muscle removed
- 1/4 lb. bacon, diced
- 1 scallion, thinly sliced
- 1 shallot, minced
- 2 tbsp. apple cider vinegar
- 1 tsp. sugar
- 1 tsp. dijon mustard
- 1 tsp. fresh thyme leaves
- canola oil, for brushing scallops
- kosher salt
- black pepper

Recipe
  • Heat a grill to high.
  • Add the bacon to a skillet over medium heat and cook for 6-10 minutes, or until crisp and brown.
  • Remove the bacon to a bowl with a slotted spoon, leaving the fat in the pan. Add the scallion to the bacon and stir to combine.
  • Brush the scallops with oil and season with salt and pepper.
  • Grill the scallops for 2-3 minutes per side, flipping once, then transfer to a plate or platter.
  • Add the shallots to the pan with bacon fat and cook for 1-2 minutes, until soft. Add the vinegar and sugar and bring to a boil and cook until the sugar dissolves.
  • Turn off the heat and stir in the mustard, thyme, and a pinch of salt and pepper.
  • Drizzle the sauce over the scallops and sprinkle with the bacon and scallions.


Serves two

Wednesday, June 17

Grilled Snapper with Onion Escabeche

The secret to flavorful fish is marinating it after it's cooked


Bon Appetit Grilled Snapper with Onion Escabeche


Fish doesn't need to be something you eat only on special occasions and can be an inexpensive, simple, and healthy weeknight meal. This recipe for grilled snapper with onion escabeche comes from the latest issue of Bon Appetit and calls for grilling quick-cooking, easy-to-find snapper fillets and then marinating them in oil, vinegar, and onions. By marinating the fish after it's cooked, the fish absorbs all the flavor without changing its delicate texture. With the exception of the snapper, I almost always have the rest of the ingredients on hand in the fridge and pantry. We liked this so much for a weeknight meal that we've already eaten it a couple times in the last few weeks. The fish is very mild and not "fishy" at all, which makes it a great option for the whole family.

Note: Snapper is often called rockfish at many grocery stores and fish markets. Using skin-on fillets will make it easier to grill but either will work. If you don't have an outdoor grill or don't want to use it, you can cook the fish on a grill pan or even in a hot skillet.


More Grilled Fish Recipes:
- Grilled Sicilian Swordfish
- Whole Grilled Snapper with Lemon-Garlic Sauce
- Grilled Salmon with Spicy Mustard Sauce


Grilled Snapper with Onion Escabeche:
  • Heat a grill to high.
  • Brush 2 boneless snapper fillets (preferably skin-on) with canola oil and season with salt and pepper.
  • In a bowl, combine 1/4 thinly sliced red onion, 2 tbsp. rice vinegar, and 2 tbsp. extra virgin olive oil and let sit.
  • Grill the fish for 3-4 minutes (skin side down), then flip and cook for another 2-3 minutes.
  • Transfer the fish to a plate and pour the onion mixture on top. Let side, uncovered, for 10 minutes.
  • Garnish with a handful of fresh parsley leaves and serve.

Serves two

Tuesday, June 16

Italian Frittata Sandwiches

How Europeans do an egg sandwich


Giada DeLaurentiis Italian Frittata


Almost every country in Europe seems to have their own take on a frittata, which is basically a baked dish of eggs with various other ingredients mixed in. I've featured many frittata recipes on KSD over the years but love how this recipe from Giada DeLaurentiis takes things a step further by putting it on a sandwich. The frittata has two of my favorite Italian ingredients, prosciutto and parmesan, along with potatoes, onion, basil, and garlic. It cooks until set and then is cut into squares and sandwiched between buttery garlic bread with some peppery greens. It can be served room temperature or warm and is one of those recipes that works equally well for breakfast as it does for lunch or dinner.

Note: As previously mentioned, I hate do not like mayonnaise. However, both my husband and I agreed that this sandwich might be great with some mayo or aioli in place of butter on the bread. Do as you wish.


Related Recipes:
- Swiss Chard, Potato, & Aged Cheddar Frittatas
- Egg, Bacon, & Cheese Breakfast Sandwiches
- Chorizo, Egg, & Potato Breakfast Burritos


Italian Prosciutto & Potato Frittata Sandwiches:
Ingredients
- 1 baguette, cut in 8 and halved lengthwise
- 1 large russet potato (7 oz.)
- 6 large eggs
- 1/2 onion, thinly sliced
- 2 oz. prosciutto, chopped
- 1 1/2 c. baby arugula, loosely packed
- 1/4 c. heavy cream
- 1/4 c. grated parmesan cheese
- 3-4 tbsp. butter, at room temperature
- 3 tbsp. olive oil
- 2 tbsp. basil, sliced or torn
- 2 garlic cloves, minced
- 1 garlic clove, peeled and left whole
- kosher salt
- black pepper

Recipe
  • Poke holes all over the potato with a fork and microwave for 3 minutes, or until partially cooked. Let cool until you can handle it, then peel off the skin and dice into bite-size pieces.
  • Meanwhile, whisk together the eggs, cream, parmesan, prosciutto, and a big pinch of salt and pepper in a large bowl.
  • Heat the olive oil in a medium skillet over medium high heat and add the onion. Cook for 3-4 minutes, or until starting to soften, then add in the potatoes and minced garlic and cook for another 5-7 minutes, or until the potatoes are cooked through and brown in some places. Season with salt and pepper.
  • Preheat the broiler to high.
  • Add the eggs to the skillet with the potato mixture and reduce the heat to medium low. Cook for a few minutes, or until the edges are starting to set but the top and center are still jiggly.
  • Transfer to skillet to the broiler and broil until the top is golden and the center is set, about 3-5 minutes.
  • Let the frittata cool slightly and toast the bread.
  • Rub the toasted bread with the whole garlic clove and spread with butter.
  • Loosen the frittata with a spatula and cut into squares. Place the frittata slices and a bit of arugula between the bread and serve.

Serves six-eight

Tuesday, June 9

Grilled Salmon with Spicy Mustard Sauce

Don't be afraid to throw fish on the grill this summer


Bobby Flay grilled salmon recipe


My husband and I eat seafood pretty often, but there's something about living near the beach in the summer that makes fish even more appealing. June means that it's Copper River salmon season and we can buy gorgeous Alaskan salmon fillets at our supermarket and local fishmonger. Salmon is one of the most grill-friendly fishes out there because the flesh is firm and meaty and the skin protects the fish from the hot flames (while getting crispy as a cracker while it cooks). My husband has been really into grilling for every meal and he's gotten good at making pretty much every recipe in Bobby Flay's Grill It cookbook. This meal calls for simply grilling salmon and then serving it with a no-cook mustard sauce and a little salad of arugula and red onion. The tangy, spicy sauce and fresh greens make a nice contrast to the rich salmon fillet and the whole dish comes together in no time. This works just as well for a summer barbecue as it does for a weeknight meal.


More Salmon Recipes:
- Grilled Salmon Burgers
- Copper River Salmon with Tomato-Avocado Salsa
- Sweet Miso-Glazed Salmon


Grilled Salmon with Spicy Mustard Sauce:
Ingredients
- 2 (8 oz.) skin-on boneless salmon fillets, preferably fresh and wild-caught
- handful of arugula or similar green
- 1/4 red onion, peeled and very thinly sliced
- 2 tbsp. olive oil
- 2 tbsp. dijon mustard
- 1 1/2 tbsp. honey
- 1 tbsp. minced parlsey
- 1 tbsp. whole-grain mustard
- 1 tbsp. prepared horseradish
- 1 tbsp. red wine vinegar
- kosher salt
- black pepper

Recipe
  • Preheat a grill to high.
  • Meanwhile, combine the mustards, honey, parsley, horseradish, and a pinch of salt and pepper in a bowl. Set aside.
  • Brush both sides of the salmon fillets with 1 tbsp. olive oil and season with salt and pepper.
  • Grill the salmon, skin-side down, for 4 minutes, then flip and cook for another 2-4 minutes, depending on how done you want it.
  • Remove the salmon from the grill and let it rest skin side up (to preserve crispiness).
  • In a bowl, combine the arugula and onion and drizzle with vinegar and 1 tbsp. olive oil.
  • Divide the salad onto plates and top with the salmon fillets. Spoon sauce on top.


Serves two, easily doubled or tripled

Thursday, June 4

Pesto Pasta with Tomatoes, Burrata, & Breadcrumbs

Pasta tossed with fresh pesto, grape tomatoes, burrata cheese, and homemade breadcrumbs


Pesto Pasta with Tomatoes, Burrata, & Breadcrumbs


This is a fabulous pasta for early summer when tomatoes are just coming in season and fresh herbs are in abundance. The combination of earthy pesto, sweet tomatoes, and creamy burrata mozzarella are reminiscent of a caprese salad but in pasta form. I'm currently obsessed with homemade breadcrumbs and love the salty, toasty crunch that they add to this dish. I add the burrata cheese at the end in big dollops so that it doesn't melt too much and keeps its rich and thick texture. It's almost better if it's not served piping hot and you could even serve it at room temperature as a pasta salad. It's a fast, fresh, and easy meal that you can enjoy all summer long.

Note: I used cappelini in this recipe because I had half a box on hand that I wanted to use up, but I think it would be even better with a thicker noodle like spaghetti or something like penne or orecchiette.  There are some great fresh pesto options at the grocery store nowadays (look for them in the refrigerated section), but I prefer my homemade pesto recipe.


Related Recipes:
- Grilled Pesto Shrimp Pizza
- Angel Hair with Roasted Cherry Tomatoes
- Grilled Asparagus with Burrata and Lemony Breadcrumbs


Pesto Pasta with Grape Tomatoes, Burrata Cheese, and Homemade Breadcrumbs:
Ingredients
- 1/2 lb. pasta
- 8 oz. burrata cheese
- 1 pint of grape tomatoes, halved
- 2 slices of stale bread
- 1/4 c. pesto
- 3 tbsp. olive oil
- kosher salt
- black pepper

Recipe
  • Bring a large pot of water to a boil. Season with salt.
  • Meanwhile, place the bread in a food processor and pulse to form large crumbs. Do not grind to a very fine powder.
  • In a large skillet, heat 2 tbsp. olive oil over medium high heat. Add in the crumbs and a pinch of salt and pepper and cook for a few minutes, stirring occasionally, or until the crumbs are crispy and golden brown.
  • Transfer the breadcrumbs to a plate, wipe out the skillet, and add in the remaining tbsp. of olive oil.
  • Add the tomatoes, reduce the heat to low, and cook a few minutes until softened but still holding most of their shape.
  • Add the pasta to the boiling water and cook until al dente. 
  • Drain the pasta, reserving 1/3 c. cooking water, and add both to the skillet with the tomatoes.
  • Add in the pesto and stir well until the pasta is coated with pesto. Dollop the burrata all over the pasta and turn off the heat.
  • Transfer the pasta to plates and sprinkle with breadcrumbs.


Serves three-four

Monday, June 1

Duck Breasts with Cherry Salsa

Turn fresh cherries into a sweet-savory salsa for grilled or roasted meat


Fresh cherries are everywhere at our markets in L.A. I can buy a big bag of them, set them out on the table with a small bowl next to it for pits and stems, and they'll be gone before the afternoon is over. But when it comes to cooking with them, my favorite thing to do is use them in savory dishes. The fruit is so sweet on its own that it makes a really nice contrast to rich and fatty meats like duck. In this recipe, a simple pan-roasted duck breast is topped with a sweet and spicy salsa made from cherries, jalapeño, red onion, and cilantro. It's a quick meal and the only step that takes any time is pitting the cherries, but luckily you only need to pit a cupful. The salsa idea comes from a Raley's newsletter that my aunt sent me, and while the combination of cherries with raw onion and cilantro might sound odd, it really works together and tastes delicious. If you're not a fan of duck or have trouble finding it at the market, the salsa would also pair well with pork or lamb.


Related Recipes:
- Duck Breasts with Fig Sauce
- Poached Cherries with Goat Cheese
- Duck with Cherry Port Sauce


Pan-Roasted Duck Breasts with Cherry Salsa:
Ingredients
- 2 large duck breasts, skin on and boneless
- 1 c. fresh cherries, pitted and diced
- 1 jalapeño, seeds removed and minced
- 2 tbsp. red onion, minced
- 1 tbsp. fresh cilantro, minced
- 1/2 tbsp. fresh-squeezed lime juice
- kosher salt
- black pepper

Recipe
  • Combine the cherries, jalapeño, onion, cilantro, lime juice, and a pinch of salt in a bowl and stir to combine. Check for seasoning and set aside.
  • Meanwhile, heat a large heavy skillet over medium heat.
  • Score the fat on the duck breasts in a criss-cross pattern with a pairing knife and season both side of the duck with salt and pepper.
  • Add the duck to the pan, fat side down, and cook for 8-10 minutes, or until the fat has rendered and the skin is brown and crispy.
  • Flip the duck over and cook for another 2-3 minutes. The duck should be pink in the center still.
  • Let the duck rest for a few minutes, then slice and serve with the cherry salsa.

Serves two, with some salsa left over

Thursday, May 21

Cappelini with Lobster, Lemon, & Chives

Angel hair pasta tossed with buttery lobster, fresh lemon, and chives


Canal House Cooks Everyday Lobster Cappelini


My husband and I had our second wedding anniversary on Monday. To celebrate, we went back to our wedding site, the Beverly Wilshire hotel, over the weekend and had a very memorable dinner at Wolfgang Puck's CUT Steakhouse. But because one celebration just wasn't enough, we also made a lobster dinner at home and popped some champagne the next night. This pasta, adapted slightly from Canal House Cooks Everyday, is elegant in its simplicity - just pasta and lobster with a buttery sauce to bring it all together. You can certainly steam and crack your own lobster, but buying lobster meat directly from the a seafood or nice grocery store will save you a ton of time, enough to make this a weeknight-friendly meal. It's a special meal that is worthy of a big celebration.


More Lobster Recipes:
- Lobster & Truffle Pasta
- Steamed Lobster
- Lobster Risotto


Cappelini with Lobster, Lemon, & Chives:
Ingredients
- 1 3/4 lb. lobster, cooked and meat removed from shells
- 1/3 lb. dried cappelini (angel hair) pasta
- 5 tbsp. butter
- 1 lemon, juiced
- small bunch of chives, minced
- pinch of red chile flakes
- kosher salt

Recipe
  • Bring a large pot of water to a boil and season generously with salt. Taste it if necessary, it should taste salty.
  • In a large skillet, melt 3 tbsp. butter with the red chile flakes over medium low heat.
  • Add the lobster meat and about 2 tbsp. lemon juice to the skillet. Season with salt.
  • Add the pasta to the boiling water and cook for 2 minutes.
  • Drain the pasta, reserving 1/2 c. cooking liquid.
  • Immediately transfer the pasta to the pan with the lobster and add in 2 more tbsp. butter.
  • Toss the pasta to combine, adding pasta water as needed to moisten (I used almost all of it).
  • Check for seasoning and add more salt or lemon if needed. Sprinkle in the chives and toss once more.
  • Serve immediately and enjoy.

Serves two

Wednesday, May 20

Bacon, Egg, & Spring Veggie Fried Rice

Use up leftover rice in this quick and easy one-pot meal


Spring Vegetable, Bacon, and Egg Fried Rice


I shared my go-to fried rice recipe as one of my first posts on this blog and still make it often, sometimes tweaking it based on whatever leftovers I have around the house. This version comes from a recipe I saw in Food52 and includes a medley of vegetables, lots of egg, and - most importantly - bacon. The salty bits of pork with the soft scrambled egg and fresh vegetables are a delicious combination, but it's the addition of one non-traditional ingredient, honey, that really sets it over the top. The honey adds a touch of sweetness that helps to enhance the savory flavors of the dish, but it also sticks the rice to the pot to form some nice caramelized bites. I use brown rice because I figure it's an easy way to make the dish a little healthier, but any leftover rice will do. This holds up well in the fridge for a day or two and can be reheated for leftovers.

Note: As with any stir-fry, the cooking time goes by fast and it's essential to have all your ingredients prepped before you turn on the stove.


More Fried Rice Recipes:
- Chicken & Broccoli Fried Rice
- Fried Brown Rice with Broccoli & Egg
- Chicken & Mushroom Fried Rice


Bacon, Egg, & Spring Veggie Fried Rice:
Ingredients
- 4 c. cooked brown rice
- 3 eggs, lightly beaten
- 4 slices of thick-cut bacon, diced
- 1 small onion, thinly sliced
- 2 c. baby kale, spinach, or other sturdy green
- 1 c. shiitake mushrooms, sliced
- 3/4 c. peas, fresh or defrosted
- 4 garlic cloves, peeled and thinly sliced
- 3 tbsp. low-sodium soy sauce
- 2 tbsp. canola oil
- 1 tbsp. ginger, peeled and minced
- 1 tbsp. toasted sesame oil
- 1/2 tbsp. honey

Recipe
  • Add the bacon to a wok or large skillet over high heat and cook for 3-4 minutes, or until browned. Transfer bacon to plate with a slotted spoon, leaving the fat in the pan.
  • Add in the beaten eggs and cook, stirring occasionally, for a minute or two, until lightly scrambled. Do not overcook.
  • Scrape the egg on to a plate and return the wok to the heat. 
  • Add in the canola oil and onion. Cook for 2-3 minutes, or until softened, then add in garlic and ginger.
  • Cook for a minute, then add in the mushrooms and cook for another 2 minutes. 
  • Add in the kale and cook for 30 seconds, or until wilted.
  • Add in the rice, soy sauce, and toasted sesame oil and toss together, making sure to break up any big clumps of rice.
  • Add in the peas and cook for another minute, then add in the bacon and egg.
  • Drizzle with honey and check for seasoning.

Serves four


Monday, May 18

Grilled Asparagus with Lemon, Breadcrumbs, & Burrata

A meatless main of creamy burrata, grilled asparagus, and lemony breadcrumbs


Grilled Asparagus with Burrata and Lemon Breadcrumbs


Yes, hidden under all that grilled asparagus and toasted lemony breadcrumbs is a mound of soft burrata cheese. This is exactly the type of meatless Monday meal that I can get excited about - tender, slightly charred asparagus, crunchy homemade breadcrumbs with lots of zest and herbs, and one of my favorite creamy cheeses. I saw a version of the asparagus and breadcrumb mixture at Gjusta the other weekend but was too preoccupied with their smoked brisket sandwich (it's worth the long wait in line) to try it. In my opinion, adding a ball of burrata to any salad makes it a meal and both my husband and I were full from this plate of food, although you could certainly serve this on a platter and let a larger group share at a potluck or dinner party.


Related Recipes:
- Snap Pea, Arugula, & Burrata Salad
- Asparagus & Arugula Salad with Pecorino Dressing
- Grilled Eggplant with Burrata Cheese & Romesco


Grilled Asparagus with Lemon, Breadcrumbs, & Burrata Cheese:
Ingredients
- 2 balls of burrata cheese, preferably left at room temperature for a few hours
- 2 bunches of asparagus, woody ends trimmed
- 1/4 stale baguette, cut or torn into small pieces
- 1 lemon, zested
- 1/4 c. olive oil + extra for drizzling
- 2 tbsp. fresh parsley, minced
- kosher salt
- black pepper

Recipe
  • Heat a grill to high.
  • Toss the asparagus with 2 tbsp. olive oil and season with salt and pepper.
  • In a food processor or blender, pulse the bread until large crumbs form. Don't grind them too fine into a powder. You should have 3/4 c. - 1 c. of breadcrumbs.
  • Heat 2 tbsp. olive oil in a skillet and add the breadcrumbs and a pinch of salt and pepper. Toast the crumbs until crispy and golden. Turn off the heat and add in the lemon zest and parsley.
  • Grill the asparagus for 3-4 minutes, then flip and grill for another 3-4 minutes, or until charred in some spots and tender. Chop the asparagus into thirds.
  • Tear open a ball of burrata on the bottom of each plate and season with salt and pepper.
  • Top each plate of burrata with half of the asparagus and half of the breadcrumbs.
  • Drizzle with olive oil and enjoy.

Serves two (main course)


Monday, May 11

Coconut-Pineapple Pork & Black Bean Tacos

Turn ground pork and canned beans into quick and flavorful tacos


Food52 Coconut Lime Pork Black Bean Tacos


Tacos are a mainstay around our house and run a wide range of styles from healthy grilled veggie to crispy cheesy beef. I thought I'd tried nearly every kind of taco out there until I came across this recipe for coconut-pineapple pork and black bean tacos from Food52. Ground pork and beans cook with a blend of spices and then simmer in a mixture of coconut milk, pineapple, and lime juice. The tacos are a  blend of spicy, sweet, and tangy flavors and get an added kick from fresh herb and raw vegetable garnishes. The main ingredients of the dish, ground pork and canned beans, are very inexpensive and high in protein, making this a surprisingly inexpensive and healthy meal. I actually made a double recipe and used the leftovers in a burrito bowl with brown rice, which served as a bed for all the coconut-milky sauce (highly recommended).

Note: Because the pork is rather saucy, I recommend double stacking your tortillas to prevent them from getting soggy or falling apart.

More Taco Recipes:
- Grilled Cod Tacos with Citrus Slaw & Avocado Crema
- Flank Steak & Rajas Tacos
- Grilled Summer Vegetable Tacos
- Crispy Ground Beef Tacos


Coconut-Pineapple Pork & Black Bean Tacos:
 Ingredients
- 8-10 corn tortillas
- 1 lb. ground pork
- 1 can (15 oz.) black beans, drained and rinsed
- 1 onion, minced
- 1 garlic clove, minced
- 1 avocado, thinly sliced
- 2/3 c. coconut milk
- 1/4 c. pineapple juice*
- 1 tbsp. lime juice
- 1 tbsp. coconut or canola oil
- 2 tsp. ground cumin
- 2 tsp. smoked paprika
- 1 tsp. dried oregano
- 1/4 tsp. cayenne pepper
- kosher salt
- black pepper
- fresh cilantro, crumbled cheese, thinly sliced radish (suggested garnishes)

Recipe
  • Heat the oil over medium high heat in a large skillet and add the onion.
  • Cook for 5 minutes, or until the onion is translucent, then add in the garlic and cook for another minute.
  • Stir in the cumin, paprika, oregano, and cayenne and cook for another minute.
  • Add in the pork and use a wooden spoon to break up the meat. Season with a big pinch of salt and pepper.
  • Cook for another 5 minutes, or until the meat is brown. Don't stir too much or the meat won't brown and get good crispy bits.
  • If there is a lot of rendered fat in the pan, drain some of it off (my pork was pretty lean so I didn't do this). Add in the coconut milk and lower the heat to a simmer for about 5 minutes, or until thickened.
  • Add in the beans, pineapple juice, lime juice, and another pinch of salt. Cook for another few minutes then check for seasoning.
  • Use a slotted spoon to divide the mixture into tortillas. Garnish with some avocado, cilantro, cheese, and radish.

Serves four-five
*This is a great use for those little cans of pineapple juice you might have in the back of your pantry.

Wednesday, May 6

Sticky Asian Chicken Wings

Sweet, sticky, and tangy baked chicken wings


Sticky Sesame Wings Smitten Kitchen


I love anything that you can eat with your hands, preferably off of a bone, and am a firm believer that chicken wings should be enjoyed year round and not just on game days. As far as weeknight meals go, chicken wings or drumettes should be a go-to: they're inexpensive, quick-cooking, and loved by kids and adults. This recipe (lightly adapted from Smitten Kitchen) couldn't be easier. Just whisk the ingredients for the sauce, toss with the wings, and baked on a sheet pan until caramelized and sticky. It takes about 3 minutes of active time and about 40 minutes until dinner is ready. While they're baking, I suggest making this ginger-miso salad as an accompaniment.


More Chicken Wing Recipes:
- Sweet & Spicy Asian Chicken Wings
- Grilled Chicken Wings with Jalapeño Yogurt Dip
- Baked Buffalo Wings with Blue Cheese Dip
- Grilled Honey-Lime-Sriracha Wings


Sticky Asian Chicken Wings:
Ingredients
- 1 1/2 lbs. chicken wings or drumettes
- 1 scallion, thinly sliced
- 1 1/2 tbsp. sesame seeds, toasted
- 1 garlic clove, minced
- 2 tbsp. low-sodium soy sauce
- 2 tbsp. hoisin sauce
- 2 tbsp. honey
- 1 tsp. toasted sesame oil
- 1 tsp. kosher salt
- several drops of Sriracha or other hot sauce, or more to taste

Recipe

  • Preheat the oven to 425F. Cover a large rimmed baking sheet with foil and spray with non-stick cooking spray.
  • Meanwhile, whisk together garlic, hoisin, soy sauce, honey, sesame oil, salt, and Sriracha in a large bowl.
  • Add in the chicken wings and toss to coat. Spread the chicken wings and any remaining sauce onto the baking sheet and place in the oven.
  • Bake for 35 minutes, turning the wings over halfway through, or until wings are cooked through and the sauce is thick and sticky.
  • Transfer to a serving plate or bowl and sprinkle with the sesame seeds and scallion.

Serves two, can be easily doubled

Tuesday, May 5

Farfalle Pasta with Fava Bean Pesto

A riff on pesto pasta using my favorite spring vegetable


Pasta with Fava Bean Pesto


Fava beans are one of my favorite spring vegetables, but they are only available at my local farmers' market for a few short weeks every year during the spring. This recipe transforms the beans into a smooth pesto by cooking the beans with garlic, chile, and olive oil until tender and then blending them with pine nuts, parsley, and parmesan cheese. The pesto is rich and thick and makes a great sauce for hot pasta. There is actually a lot of vegetables in every serving, which makes it a filling one-pot meal. Make extra pesto and spread it onto a sandwich or serve it as a dip later in the week.


Related Recipes:
- Pasta with Mashed Fava Beans
- Creamy Linguine with Peas
- Pesto Orecchiette with Chicken, Peas, & Fava Beans


Farfalle Pasta with Fava Bean Pesto:
Ingredients
- 2 1/2 lbs. fava beans in pods, beans removed from pods
- 1 lb. farfalle pasta
- 3/4 c. fresh parsley leaves
- 1/4 c. + 2 tbsp. extra virgin olive oil
- 1/4 c. grated parmesan cheese, plus more to garnish
- 2 garlic cloves, thinly sliced
- 2 tbsp. pine nuts, toasted
- pinch of red chile flakes
- kosher salt
- black pepper

Recipe
  • Bring a pot of water to a boil, add in the fava beans, and cook for 2 minutes.
  • Drain the beans and transfer to a bowl of ice water to cool. Peel off the outer skin of the fava beans and discard.*
  • Heat 2 tbsp. olive oil over medium high heat and add in the garlic, chile flakes, and fava beans. Season with salt and pepper.
  • Cook for 5-7 minutes, or until the fava beans are soft.
  • Transfer the fava bean mixture to a food processor and add the pine nuts and parsley. Pulse until this forms a paste.
  • Slowly stream in 1/4 c. olive oil, then stir in the parmesan cheese. Check for seasoning.
  • Meanwhile, bring a large pot of water to a boil, season with salt, and cook the pasta according to package directions.
  • Drain the pasta, reserving 1/4 c. pasta cooking liquid.
  • Add the pasta back to the pot and toss with the fava bean pesto and some of the cooking water.
  • Divide onto plates and sprinkle with a little more parmesan cheese.

Serves four
*Fava beans can be prepped and refrigerated a few days in advance.

Friday, May 1

Ginger-Miso Snap Pea, Radish, & Napa Cabbage Salad

Crunchy sliced vegetables in a creamy Japanese-style dressing


The side salads I make for dinner are usually an afterthought, just some mixed greens and maybe some leftover veggies or cheese tossed with olive oil and lemon. There's nothing wrong with that, but when I make salads like this Smitten Kitchen-inspired snap pea, radish, and napa cabbage salad with creamy ginger-miso dressing, I never want to eat a simple green salad again. The main star is the ginger-miso dressing, which is salty, sweet, nutty, and creamy without the addition of any dairy. If you don't want to go through the hassle of prepping and slicing all the vegetables (but you should - it's worth it), you could put the dressing on some romaine lettuce and call it a day. The salad is heavy on crisp-tender sugar snap peas, which are in season for the next couple of months and are so sweet that you might even be able to skip blanching them and use them completely raw.  The napa cabbage adds bulk and the radishes add bite for a crunchy salad that will hold up to the dressing and can even sit out for a bit without wilting. You could add some shredded chicken to make this a main course, but I served it as a side dish to sticky Asian wings (coming to KSD soon).

Note: The dressing can be made in advance and kept in the fridge for a couple days, in case you want to plan ahead and double the recipe for more salads later in the week.


Related Recipes:
- Grilled Sesame-Soy Bok Choy Salad
- Kale Soba Noodle Bowl with Ginger-Lime Dressing
- Miso Asian Pear Salad


Snap Pea, Radish, & Napa Cabbage Salad with Creamy Ginger-Miso Dressing:
Ingredients
- 1/2 head napa cabbage, thinly sliced (about 3 cups)
- 1/2 lb. sugar snap peas
- 4-5 large radishes, cut into matchsticks
- 4 scallions, ends removed, thinly sliced
- 3 tbsp. sesame seeds, toasted in a dry skillet until golden
- 1/4 c. rice vinegar
- 2 tbsp. sesame oil
- 2 tbsp. canola or olive oil
- 2 tbsp. tahini paste*
- 2 tbsp. miso paste + more to taste
- 1 tbsp. honey
- 1 tbsp. ginger, peeled and minced
- 1 garlic clove, minced

Recipe
  • In a blender, combine the rice vinegar, sesame oil, canola oil, tahini, miso, honey, ginger, and garlic and blend until smooth. Set the dressing aside.
  • Meanwhile, bring a pot of water to a boil and add in the sugar snap peas. Boil for 1 minute, then drain and immediately transfer to a bowl of ice water.
  • Let the sugar snaps cool in the water, then pat dry with a towel and thinly slice, removing any tough stems or strings.
  • Combine the snap peas with the cabbage, radishes, scallions, and half of the sesame seeds.
  • Add most of dressing and toss to coat. Add more dressing if needed and sprinkle with remaining sesame seeds.


Serves four-six (side dish)
*Sesame seed paste. Often found by the nut butters in the grocery store.

Wednesday, April 29

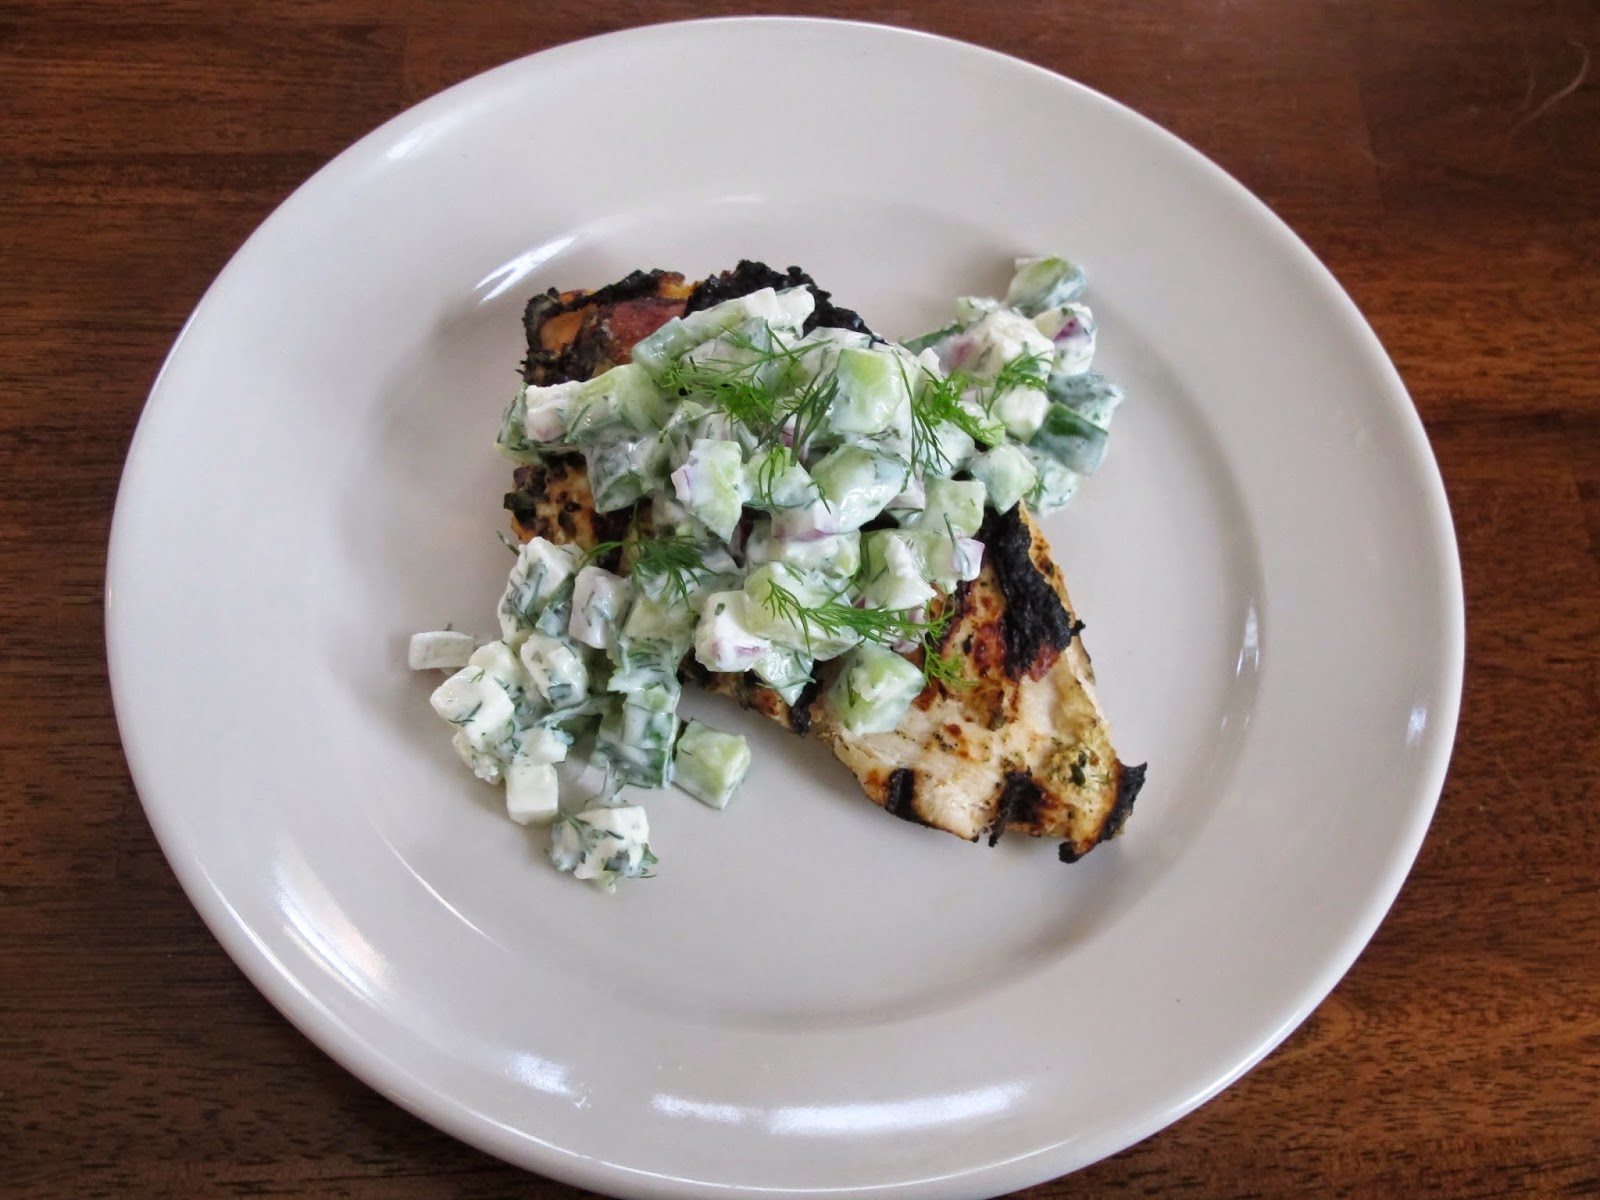
Yogurt-Marinated Grilled Chicken with Tzatziki Salad

Mediterranean grilled chicken with a creamy and crunchy cucumber relish


Sprouted Kitchen Greek Grilled Chicken with Tzatziki


I'm a sucker for anything with tzatziki, a Greek yogurt sauce, and have featured many recipes for it on this blog. So it should come as no surprise that I have been anxiously waiting to make this recipe (which I've actually adapted quite a bit) for grilled chicken with tzatziki from the Sprouted Kitchen cookbook for several months. This version of tzatziki is actually more of a salad than a sauce and features lots of diced cucumbers, red onion, and herbs with just a little bit of yogurt and lemon to bind it. I also added some chunks of feta, mainly because I'm obsessed with the good sheep's milk feta that's packed in water from Whole Foods (first mentioned here) and have been coming up with excuses to buy it as much as possible. The chicken is marinated in many of the same ingredients that are in the tzatziki, plus some additional herbs and spices, and gets nice and charred on the hot grill. Pounding out the breasts allows the meat to cook evenly and provides extra surface area to spoon the salad on top of. This makes a healthy but filling meal, especially paired with some couscous or warm rice.

Note: This recipe is pretty forgiving about being prepared in advance or reheated. The only thing you should not do is add salt to the tzatziki salad until just before eating. The salt will draw water out of the cucumbers and make the mixture watery if it sits for a long period of time.


Related Recipes:
- Salmon with Radish Raita Sauce
- Grilled Lamb Burgers with Feta, Tzatziki, & Arugula
- Beef & Lamb Kofta with Yogurt Sauce


Yogurt-Marinated Grilled Chicken with Tzatziki Salad:
Ingredients
- 4 boneless skinless chicken breasts, pounded 1/4" thin
- 3 Persian or hothouse cucumbers, diced small (about 3 cups)
- 1/4 red onion, diced small
- 3-4 oz. feta cheese, preferably sheep's milk, diced small
- 1 lemon, zested and juiced + 3 tbsp. lemon juice
- 1 1/3 c. whole-milk Greek yogurt
- 1/4 c. fresh parsley, chopped
- 1/4 c. fresh dill, chopped
- 2 tsp. ground cumin
- 1 tsp. dried oregano
- 1/4 tsp. red chile flakes
- 1 clove garlic, minced
- kosher salt
- black pepper

Recipe
  • Whisk together 1 c. yogurt, lemon zest, juice of 1 lemon, 2 tbsp. parsley, 2 tbsp. dill, cumin, red chile flakesoregano, and 1 tsp. each of salt and pepper.
  • Place in a resealable bag with the chicken and marinate for 30 mins at room temperature or up to to several hours in the fridge.
  • Preheat a grill to high and remove the chicken from the fridge if it was marinating in there.
  • Grill the chicken for 4 minutes, then flip and cook for another 4 minutes. Transfer chicken to a plate and let rest for 10 minutes.
  • Meanwhile, combine the cucumbers, onion, garlic, and remaining dill and parsley in a bowl.
  • Stir in 1/3 c. yogurt and 3 tbsp. lemon juice and a large pinch of salt and pepper. Mix well and taste for seasoning. Gently stir in the feta, trying not to break it up.
  • Divide the chicken onto plates and top each with a generous amount of tzatziki salad.

Serves four


Tuesday, April 28

Creamy Linguine with Peas

Pasta and sweet peas bathed in heavy cream


Linguine and Peas Bathed in Cream


I love coming home from work, preparing dinner, and being able to eat it (preferably with my husband in our backyard) before the sun goes down. The changing seasons and longer days are getting me excited for warm summer evenings when we can dine al fresco every night. I find myself wanting to do less cooking this time of year so that I can fill my after-work hours with more walks and activities before sunset. This pasta comes from Canal House Cooks Everyday and requires barely any time in the kitchen. Pasta and peas (I can get fresh English peas at my farmers market, and they're worth seeking out if you can find them) are tossed with a generous amount of heavy cream and parmesan cheese... and that's about it. The pasta is creamy but not heavy and is especially good with a simple green salad with an acidic vinaigrette. Add it to your weeknight dinner rotation and you won't be disappointed.


Related Recipes:
- Pesto Orecchiette with Chicken, Peas, & Fava Beans
- Garlicky Fettuccine Alfredo with Peas
- Risotto Carbonara with Peas


Creamy Linguine with Peas:
Ingredients
- 1 lb. linguine or fettuccine pasta
- 1 lb. English peas, fresh or defrosted
- 5-6 scallions, sliced
- 1 c. heavy cream
- 1 c. grated parmesan cheese
- 2 tbsp. salted butter
- kosher salt
- black pepper

Recipe
  • Bring a large pot of water to a boil, season generously with salt (taste it - it should taste a bit salty), and add in the pasta.
  • Cook until 2 minutes before al dente, then add in the peas and scallions and cook for another minute.
  • Drain and reserve 1 c. pasta cooking water and return the empty pot to the stove over low heat.
  • Add the butter and cream to the pot and cook for a couple minutes, or until the mixture starts to bubble.
  • Add in the pasta mixture, parmesan, a splash of the pasta water, and a generous amount of freshly cracked black pepper.
  • Toss together for about a minute, adding more pasta water if needed to moisten. Check for seasoning and add some salt or more pepper if needed.
  • Divide onto plates and serve.

Serves four-five

Tuesday, April 7

Snap Pea & Burrata Salad

Sweet peas, fresh greens, and creamy burrata cheese make a lovely spring salad


Add burrata cheese (the creamier, sexier cousin of fresh mozzarella) to any salad and it becomes an instant hit. It works well with fruit, roasted vegetables, and even with lighter green salads like this recipe from April Bloomfield. The salad is a really fresh combination of raw sugar snap peas, peppery arugula, and mint and basil leaves tossed some lemon juice and olive oil, but the addition of burrata takes it to a whole new level. The cheese adds richness and body and makes this a show-stopping appetizer or side dish for a spring dinner party. I actually had this as a light supper alongside grilled baguette and made little crostini-like bites as I was eating this (highly recommended).


More Burrata Recipes:
- Grilled Eggplant with Burrata & Romesco
- Grilled Peach, Burrata, & Prosciutto Salad
- Burrata, Prosciutto, & Roasted Red Pepper Sandwich


Snap Pea, Arugula, Herb, & Burrata Salad:
Ingredients
- 8 oz. burrata cheese*
- 1/2 lb. sugar snap peas, strings removed, cut in half lengthwise
- 4 c. (loosely packed) baby arugula
- 1/4 c. fresh basil leaves, torn if large, plus more to garnish
- 1/4 c. fresh mint leaves, torn if large, plus more to garnish
- 3 tbsp. extra virgin olive oil
- 2 tbsp. lemon juice
- salt, preferably fleur de sel or large flake salt**

Recipe
  • Combine the sugar snap peas, arugula, basil, and mint in a large bowl.
  • Add in the lemon juice and then the olive oil and toss to coat. Season with salt.
  • On a plate or platter, rip the burrata apart to create a bed of cheese.
  • Arrange the salad on top and drizzle with a little more olive oil and a sprinkle of salt.
  • Serve immediately.

Serves four-six (appetizer or side dish)
*I like the balls of burrata packed in water, like Angelo & Franco or Trader Joe's.
**Maldon is a great choice - I love this little tin.

Monday, April 6

Grilled Lamb Loin Chops with Mint Sauce

Savory grilled lamb with a bright and herbaceous sauce


Grilled Lamb Loin Chops with Mint Sauce


We invited our friends over for an Easter lunch yesterday and it was a beautiful spring day for grilling in our backyard. To me, you must serve lamb on Easter, and these grilled chops were a nice update from the traditional roasted lamb with mint jelly. I used lamb loin chops instead of the lollipop-style rib chops because I think they have more meat and flavor. The grilled lamb gets a nice char from the hot grill and bone-in cut helps it stay juicy. The mint and parsley sauce is bright from the lemon and fresh herbs and helps to cut through all the richness of the meat. It's the perfect dish for entertaining this spring and pairs well with fresh vegetable sides.


More Lamb Recipes:
- Crispy Lentils & Lamb
- Spiced Herbed Lamb Chops
- Lamb Bolognese


Grilled Lamb Loin Chops with Mint-Parsley Sauce:
Ingredients
- 2 1/2 to 3 lbs. bone-in lamb loin chops
- 1 lemon, zested and 2 tbsp. juice reserved
- 3/4 c. tightly-packed mint leaves
- 1/2 c. tightly-packed parsley leaves
- 1/4 c. extra virgin olive oil, plus more for brushing
- 1 tsp. sugar
- 1 garlic clove
- kosher salt
- black pepper
- aluminum foil

Recipe
  • An hour before cooking, remove the lamb chops from the fridge and allow to sit at room temperature. Brush both sides of the lamb with olive oil and season with salt and pepper.
  • In a food processor, combine the mint, parsley, lemon zest, lemon juice, sugar, and garlic and blend until a paste forms.
  • Add in the olive oil and blend until smooth. Set aside.*
  • Preheat your grill to high.
  • Cook the lamb for 8-10 minutes, turning every 2 minutes, for medium doneness.
  • Let the lamb rest, loosely tented with foil, for 10 minutes. Drizzle with the mint sauce and serve the rest on the side.

Serves four-five
*Can be made a day ahead and stored, covered, in a cool, dry place.