Monday, June 30

Fettuccine Alfredo with Blackened Chicken

Creamy pasta alfredo topped with slices of spicy grilled chicken


Fettuccine Alfredo with Blackened Chicken


We've been eating pretty healthy at home, so it was time to indulge in something a little more decadent. Fettuccine alfredo definitely satisfied the craving for an indulgent meal, but I find that it can be a little boring on its own and added in some blackened chicken breasts to liven it up and add some protein. The chicken is coated with a homemade blackening spice rub and then grilled until the outside is charred and the inside is juicy. My husband grilled the chicken while I stayed in the kitchen and made the pasta, but you could just as easily cook the breasts in the oven or in a pan on the stove if that's better for you. The pasta is based loosely off a recipe from the Pioneer Woman and is just fettuccine noodles tossed with a mixture of butter, heavy cream, and parmesan cheese. If you can't tell from the ingredients alone, it's absolutely heavenly (although unfortunately not low-cal). It's a quick and easy meal that will satisfy all your cravings and appeal to even the pickiest eaters.


Related Recipes:
- Cajun Chicken Pasta
- Fettuccine with Garlic Cream Sauce & Peas
- Spaghetti Carbonara


Fettuccine Alfredo with Blackened Chicken:
For Chicken
  • Heat a grill or grill pan to high heat.
  • In a small bowl, combine 1 tsp. smoked paprika, 1/2 tsp. cumin, 1/2 tsp. kosher salt, 1/2 tsp. cayenne pepper, 1/2 tsp. garlic powder, and 1/4 tsp. black pepper.*
  • Lightly brush 2 boneless skinless chicken breasts with canola oil and sprinkle the seasoning all over the chicken in a thin, even coating.
  • Grill the chicken for 4 minutes per side, or until the outside is black and the inside is no longer pink.
  • Let the chicken rest for five minutes, then cut into thin slices.
For Fettuccine
  • Bring a large pot of water to a boil and season with salt.
  • Add in 1/2 lb. dried fettuccine pasta and cook for about 8 minutes, or until al dente.
  • Drain the pasta, reserving 1/4 c. pasta cooking water.
  • Meanwhile, melt 3 tbsp. butter and 3/4 lb. heavy cream in a skillet and add in a pinch of salt and black pepper.
  • Turn the heat to very low and stir in 1/2 c. grated parmesan cheese until melted.
  • Add in the pasta and some of the cooking liquid and toss to combine.
  • Sprinkle another 1/2 c. grated parmesan cheese on top and toss again.
  • Check for seasoning and adjust if necessary.
  • Divide pasta into plates and serve with sliced chicken on top.


Serves two - four, depending on appetites
*Or use your own favorite blackening spice mix.


Friday, June 27

Fourth of July Recipe Ideas

These classic American recipes are the perfect way to enjoy the Fourth of July


Fourth of July Recipe Ideas


It's almost the Fourth of July, and we'll be making our annual trip to Minnesota to spend the week with my husband's family at their lake house. I look forward to the trip all year and can't wait to spend time boating, relaxing, and sharing some good meals (and drinks!) with our loved ones. We'll grill hamburgers and hot dogs and eat pasta salad and corn on the cob. After all, the Fourth of July is the time to embrace all the delicious American foods that we grew up on. Here's a list of some of my favorite all-American recipes, from a killer mac and cheese to sticky BBQ ribs.

*See previous Fourth of July menu ideas here.


Fourth of July Recipes:
  • Baked Macaroni and Cheese - The ultimate mac and cheese is baked until gooey and bubbling and has a crispy breadcrumb topping.
  • BBQ Ribs with Homemade BBQ Sauce - Sweet and tangy barbecue ribs are messy fun and an easy make-ahead recipe for your party.
  • Buttermilk Biscuits - These tender, flaky biscuits are a welcome side dish to any Fourth of July table.
  • Classic American Cheeseburgers - A traditional beef burger with melted American cheese slices and all the toppings.
  • Mixed Berry Crisp - This dessert is a great way to use in-season berries and is so much easier than making a pie. Serve with vanilla ice cream!

Thursday, June 26

Salmon with Tomato-Avocado Salsa

Simple roasted salmon is topped with a fresh cherry tomato and avocado salsa


Copper River Salmon with Tomato Avocado Salsa


We're in the midst of Copper River salmon season! Widely regarded as some of the best wild-caught salmon in the world, the fish is caught fresh in the Alaskan Copper River during a short time in the late spring and early summer every year. We're lucky enough to get the salmon delivered fresh to our local seafood market, and you can literally see the difference in quality compared to other varieties. Just look at the amazing orange color in the picture above! The fish is so flavorful and rich on its own, that I just simply roasted it in a low oven with some salt and pepper and topped it with a chunky tomato and avocado salsa. The salmon is the star of the plate, but the creamy avocado and sweet cherry tomatoes add a burst of freshness and flavor to the dish. It's a simple and healthy meal that's perfect for busy weeknights or an elegant weekend lunch with friends.

Note: If you can't get access to Copper River salmon, feel free to use whatever fresh fish you like here. Arctic char, halibut, and mahi mahi would all be great with the tomato-avocado salsa.


Related Recipes:
- Pesto-Dijon Salmon
- Baked Cod with Sherry & Butter
- Salmon Burgers with Avocado Aioli


Roasted Copper River Salmon with Tomato-Avocado Salsa:
For Salsa
  • Halve or quarter  (depending on size) 1 c. of cherry tomatoes and place in a bowl with 1 finely minced shallot and 1 tsp. finely minced jalapeno.
  • Dice 1 ripe avocado and add to the tomato mixture. Drizzle in 1 tsp. olive oil and 1/2 tsp. red wine vinegar and season with a pinch of salt.
  • Gently stir the mixture, trying to keep the avocado pieces intact.
  • Add in 1 tbsp. fresh cilantro and gently mix again right before serving.
For Salmon
  • Heat the oven to 350F.
  • Brush two 6 oz. salmon fillets with olive oil and season with salt and pepper.
  • Place the salmon on a baking sheet and cook for 8 minutes, or until still slightly translucent in the center.*
  • Divide the salmon onto plates and spoon the salsa on top.

Serves two
*Cooking time will vary based on the thickness of your fish.

Wednesday, June 25

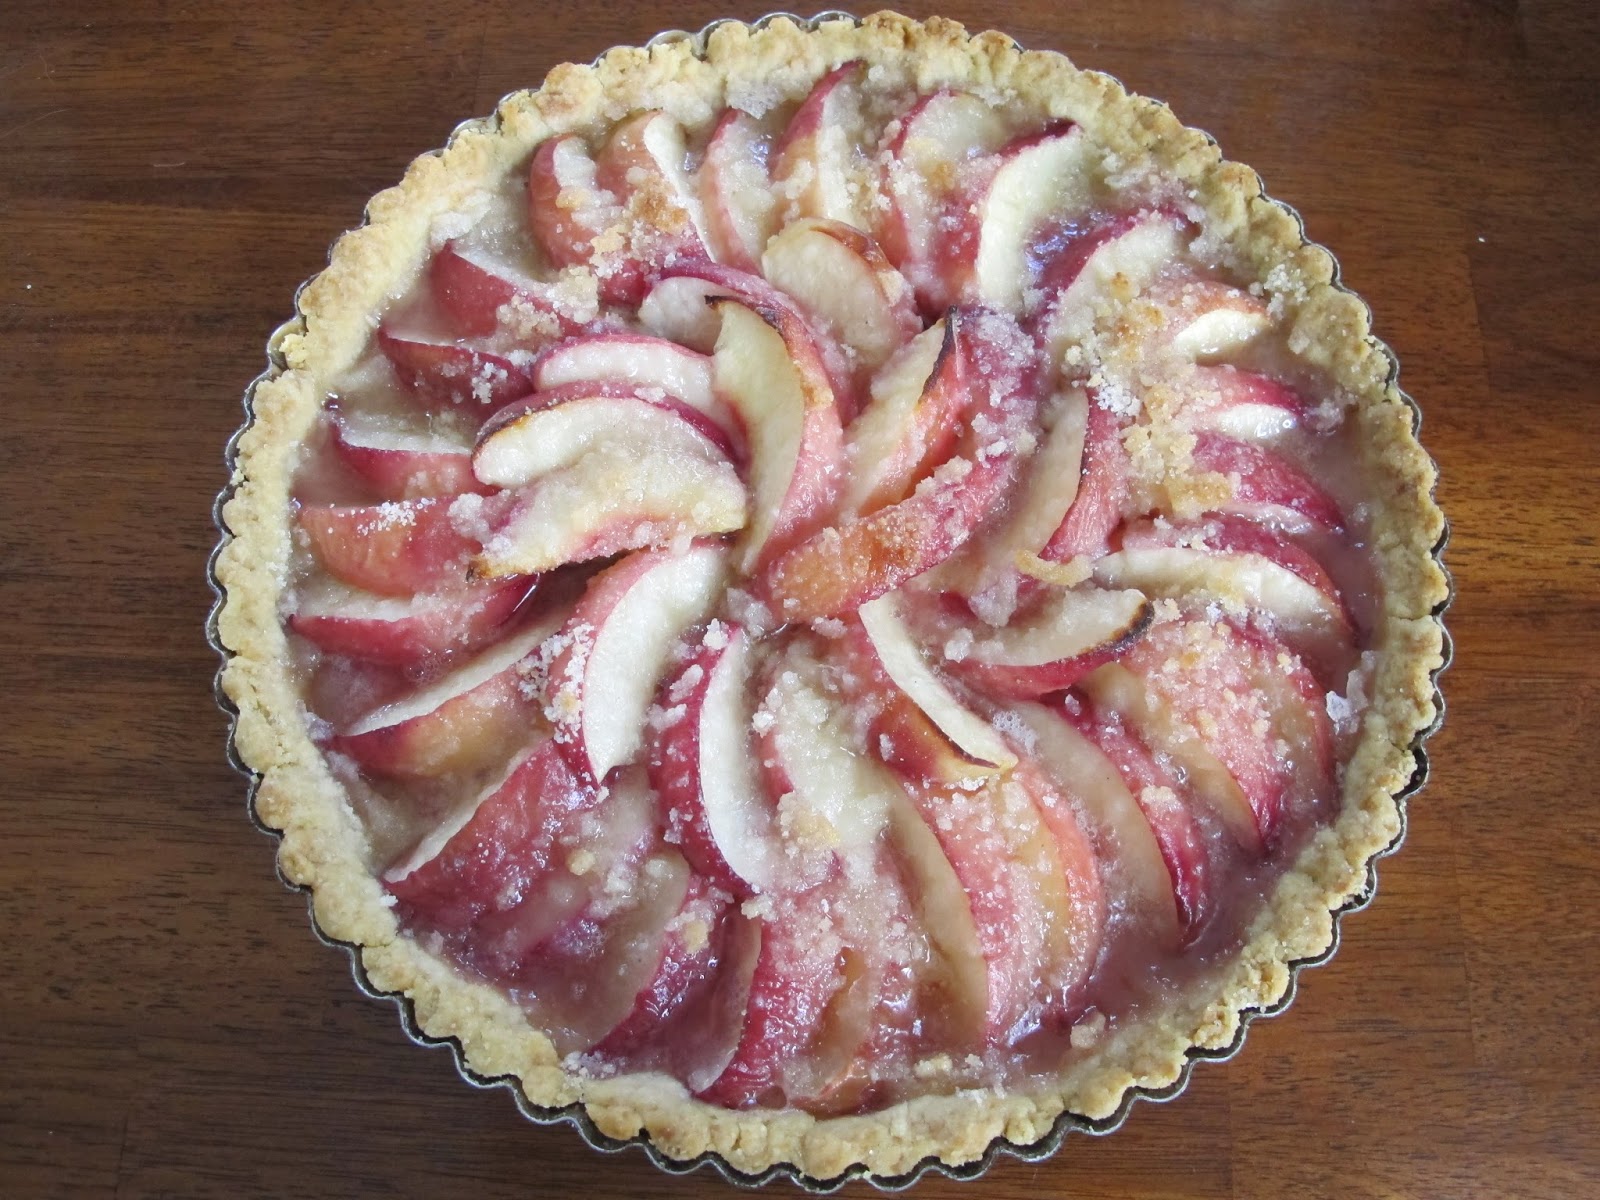
Revisited Recipe: Peach Tart with Olive Oil Crust

I have over 700 recipes (and growing) in the Kitchen Sink Diaries archive. Some of them have been tweaked and improved since their original post or were just really special to begin with. These revisited recipes are some of my all-time favorites that deserve a second look.

Peach Tart with Olive Oil Crust


It seems like peach season came early this year and endless varieties of the sweet ripe fruit are showing up at local farmers' markets and grocery stores. Peaches are great in both sweet and savory preparations, but this peach tart is one of my favorite ways to use them.  I first featured this recipe a few years ago and it's become a go-to ever since. I've even switched it up and used different types of fruit or a more traditional pie dough (or both, seen here), but the original peach tart is always a winner. As far as tarts go, this recipe is incredibly quick and easy to make. Just stir the wet and dry ingredients together and the pat the crust into your pan, mound sliced peaches on top, and sprinkle a sugary crumb topping over. The prep work literally takes about 10 minutes of time, which is perfect for last-minute dinner parties or impromptu celebrations.


Peach Tart with Olive Oil Crust:
Ingredients
For Crust
  • 1 1/2 c. all-purpose flour
  • 1/4 c. olive oil
  • 1/4 c. canola oil
  • 2 tbsp. heavy cream
  • 2 tsp. sugar
  • 1 tsp. vanilla extract
  • 1/2 tsp. salt
For Tart
  • 2-3 large peaches, slightly underripe is okay
  • 2/3 c. sugar
  • 2 tbsp. all-purpose flour
  • 2 tbsp. cold butter, diced
  • Pinch of salt

Click here to see the entire original recipe.

Tuesday, June 24

Ojai Raw Veggie Salad

A crunchy salad made with fresh raw vegetables and mixed greens inspired by a trip to Ojai


Shaved Raw Vegetable Salad


My husband and I spent the weekend on a belated-anniversary trip to the Ojai Valley Inn & Spa. We had a wonderful time relaxing at the pool, enjoying spa treatments, and celebrating our life together. The resort encourages a healthy lifestyle and offers complimentary fitness classes, healthy menu choices, and endless options for spending time outside in nature. We did our fair share of of partying, but we left feeling inspired to make healthier choices. We also took a trip to Ojai's farmers' market on our way out of town and left with a bunch of beautiful local produce which we turned into this fresh salad. The ingredients and preparation are simple, but when vegetables are this fresh, they don't need much work to taste delicious. I love all the texture that the crunchy shaved vegetables, bursting cherry tomatoes, and fragile lettuces bring to this salad. It's a vibrant, beautiful salad that can easily be customized to whatever fresh produce you can find in your area.


More Healthy Salad Recipes:
- Raw Kale, Brussels Sprout, & Hazelnut Salad
- Green Salad with Crispy Quinoa & Pomegranate
- Grapefruit, Fennel, & Avocado Salad


Ojai Raw Vegetable Salad:
For Dressing
  • Finely mince 1 shallot and place in a small bowl with 2 tbsp. lemon juice and 1 tbsp. red wine vinegar.
  • Let the shallots sit for about 5 minutes, then whisk in 1/2 tbsp. dijon mustard and a pinch of salt and pepper.
  • Slowly whisk in 1/3 c. extra virgin olive oil until emulsified.
For Salad
  • Peel and thinly slice 1 raw beet, 2 large carrots, and 1 bunch of radishes into 1/8" thick slices.*
  • Toss the vegetables with 6 c. loosely-packed mixed greens and 1 c. halved cherry tomatoes.
  • Add in some of the dressing and toss to combine.**
  • Sprinkle with 3 oz. crumbled fresh goat cheese and freshly ground pepper.

Serves two (entree)
Serves four-six (side dish)
*I highly suggest using a mandoline slicer to do this.
**You may not need all the dressing. Leftover dressing will keep in a sealed container at room temperature for a few days.

Thursday, June 19

Lazy Pho with Bok Choy

Leftover braising liquid from Chinese style ribs becomes the basis for this quick and easy take on pho 


Quick Bok Choy Pho with Pork Rib Stock


As a working wife in charge of most of our home's meal planning, I love making a recipe over the weekend and repurposing the leftovers for a different meal later in the week. The basis of any pho, the popular Vietnamese noodle soup, comes from a richly flavored broth and I used the braising liquid from these Chinese style ribs to make quick work of mine. The rib stock is initially made from simmering baby back ribs with onions, carrots, ginger, and soy sauce, which makes for a deep and flavorful pork stock. I skim the fat off the stock, add in a few spices, and then cook my vegetables and noodles in there for a simple and fast one-pot pho. If you're not using homemade rib stock, you can achieve a similar-tasting broth by adding soy sauce and ginger to store-bought beef stock.


Garnishes for Homemade Pho


Most pho contains some sort of thinly sliced or shredded meat, but I wanted something lighter after all the ribs we ate (plus the stock is pretty rich and porky on its own) and used bok choy instead. The vegetables add a little bit of crunch and body to the soup, which, when combined with rice noodles, is pretty filling. The key to a great pho is in the toppings, which are meant to be sprinkled on top as your eat your way through the soup so that their freshness and textures are preserved. My favorites are crispy fried shallot rings (see note below for the recipe), cilantro, and fresh jalapeno, but you could also do Sriracha, Thai basil, bean sprouts, etc. It's an inventive and super cheap way to use leftover stock that you might have just thrown away otherwise.


Related Recipes:
- Duck & Vegetable Asian Noodles
- Tom Kha Gai Soup
- Wonton Soup


Lazy Pho with Bok Choy:
  • Skim the fat off of 6 c. of pork rib stock* and place in a heavy pot with 2 star anise, 2 black cardamom pods, and 4 cloves.
  • Simmer the broth on low heat for 30-35 minutes, then discard the spices and increase the heat to a heavy simmer.
  • Meanwhile, thinly slice 4-5 heads of bok choy, separating the leafy green tops into a separate pile.
  • Add the non-leafy parts of the bok choy to the broth and cook for 1-2 minutes, then add in 6 oz. rice noodles and the leafy greens and simmer for another 2 minutes.
  • Spoon the soup into bowls and pass around a plate of cilantro leaves, sliced jalapenos, fried shallot rings,** etc. to garnish with.

Serves two-three
*Leftover from this recipe. If you are starting from scratch, I would suggest combining 6 c. of low-sodium beef or pork broth with 2-3 tbsp. soy sauce and 1" of sliced fresh gingerroot. Add more soy sauce if needed to taste. Remove the ginger when you discard the spices.
**To make fried shallots, heat 1/2" of canola oil in a small pot over high heat for 3 minutes. Add in 2 thinly sliced shallots and cook for 3 minutes, or until crispy and brown. Remove shallots with a slotted spoon and drain on a paper towel.


Wednesday, June 18

Chinese Style Baby Back Ribs

Tender baby back ribs are braised and then finished in the oven with a sticky Asian glaze


Chinese Style Baby Back Ribs


I've had this recipe for Chinese style baby back ribs from Food52 on my radar for awhile now and wanted to wait until summer grilling season to try them out. But when I actually read through the entire recipe, I realized that the whole dish is made in the kitchen with no outdoor grilling required. The ribs have a two-part cooking process: first, they braise on the stove with a few vegetables and soy sauce, and then they're finished in the oven with a sweet and slightly spicy Asian glaze. The whole recipe takes a few hours, but I did the braising over the weekend so that it took less than thirty minutes to finish cooking the ribs for dinner during the week. And as an added bonus, you can save the delicious rib braising liquid and use it as the basis for a quick soup (more on that later this week). The ribs are a nice alternative to the smoky and heavily sauced baby backs you'll find at most BBQ joints and are easy to multiply for parties or large families.

Note: You should be able to find the hoisin sauce, oyster sauce, and rice vinegar in the Asian aisle of most grocery stores. If not, Amazon carries them online.


More Rib Recipes:
- BBQ Ribs
- Korean Short Ribs
- Wine-Braised Beef Short Ribs


Chinese Style Baby Back Ribs:
Step 1 - Braise the Ribs:
  • Cut a full rack of baby back ribs* in half and place in a snug-fitting pot.
  • Cover the ribs with 1 quartered onion, 1" piece of thickly sliced ginger, 2-3 small carrots, and 1 c. of low-sodium soy sauce. Add water to cover the ribs by 1".
  • Bring the ribs to a boil, cover the pot with a lid, and lower the heat to a simmer.
  • Cook the ribs for 1 1/2 to 2 hours, or until the ribs are tender but not falling off the bone.
  • Let ribs cool in the liquid. Cooled ribs can be removed from the liquid and finished in the oven or kept in a sealed container in the fridge for up to 3 days.
Step 2 - Glaze & Finish the Ribs:
  • Preheat the oven to 450F.
  • Whisk together 1/3 c. honey, 2 tbsp. hoisin sauce, 2 tbsp. oyster sauce, 1 tbsp. rice vinegar, 2 tsp. low-sodium soy sauce, and 1 1/2 tsp. Sriracha in a bowl.
  • Line a baking sheet with foil and place the halved rack of ribs on the sheet.
  • Brush both sides of the ribs generously with the glaze and bake in the oven.
  • Cook the ribs for 15-20 minutes, brushing on more sauce every 5-7 minutes to form a sticky glaze.
  • To serve, slice the ribs between each bone and sprinkle with 1 tbsp. toasted sesame seeds and a handful of fresh cilantro.

Serves three
*Or any style rib you like.

Tuesday, June 17

Peach-Chile Glazed Pork Tenderloin

Grilled pork tenderloin with a sweet and spicy peach glaze


Peach-Maple-Chile Glazed Grilled Pork Tenderloin


We had a small family dinner at my parents' house for Father's Day. My brother and sister-in-law recently moved back home after living abroad for nine months, so it was great to be back together as a family and to share a meal again. My dad requested the menu with a few family favorites: cheesy scalloped potatoes, grilled corn on the cob, and a to-die-for key lime meringue pie. He also wanted a "grilled pork tenderloin with a good sauce", so I used this recipe from the Grill It! with Bobby Flay cookbook. Grilling the meat is simple, but it's the sweet and spicy peach glaze that really sets it apart. Like most recipes from the Iron Chef, the glaze is the perfect balance of sweet and tangy with a kick of heat at the end from ancho chile powder. It's a real crowd-pleaser and a nice meaty alternative to grilled beef.


Related Recipes:
- Mustard-Glazed Grilled Pork Tenderloin
- Grilled Pork Chops & Peaches
- Orange & Coriander-Rubbed Pork Tenderloin


Grilled Pork Tenderloin with Ancho Chile-Maple-Peach Glaze:
  • Heat a grill to high.
  • Meanwhile, brush 2 1/2 lbs. of pork tenderloin* with canola oil and season generously with salt and pepper. Let pork rest at room temperature while the grill heats.
  • In a small bowl, whisk together 3/4 c. peach preserves, 3 tbsp. maple syrup, 3 tbsp. orange juice, 1 tbsp. ancho chile powder** and 2 tsp. fresh thyme leaves.
  • Cook the pork on the grill for 13-15 minutes, turning to hit all four sides.
  • During the last 5-6 minutes of grilling, brush the glaze all over the pork.
  • Let pork rest for 5 minutes, then cut into 1" thick slices and drizzle some of the glaze on top. Garnish with more fresh thyme.

Serves six-eight
*I used two pork tenderloins and had the butcher remove any silver skin.
**Can substitute for regular chile powder if needed.

Monday, June 16

Grilled Swordfish & Zucchini Skewers

A quick and healthy dinner of grilled cilantro-marinated swordfish and zucchini


Grilled Swordfish & Zucchini Skewers with Cilantro Salsa Verde


My husband and I cleaned up our backyard this weekend: tending to our lemon tree, raking up leaves, and washing down the grill. We got the grill nearly a year ago and it looks brand new again after the thorough scrubbing it got. We put it to use with these simple skewers of grilled swordfish and zucchini in a cilantro marinade, based off a recipe from Food & Wine. It can be tricky to cook fish and vegetables together on the same stick, but by slicing the zucchini thinly and keeping the fish pieces on the larger side, both cook evenly and are done at the same time. It's a fresh and healthy meal that is best enjoyed al fresco with a glass of white wine, preferably while admiring the view of your freshly cleaned backyard.

Note: If you don't have an outdoor grill, you can cook the skewers on a grill pan instead.


Related Recipes:
- Grilled Swordfish Steaks with Eggplant-Pepper Salad
- Grilled Whole Snapper with Lemon-Garlic Sauce
- Grilled Salmon & Potato-Kale Hash


Grilled Swordfish & Zucchini Skewers:
  • Combine 3/4 c. fresh cilantro leaves, 1/4 c. olive oil, 4 peeled garlic cloves, 1/2 tsp. red chile flakes, and a pinch of salt in a blender and puree until smooth.
  • Meanwhile, cut 3/4 lb. swordfish fillet into 1 1/2" cubes and thinly slice 1 large zucchini into 1/8" thick slices.*
  • Fold a zucchini slice into thirds and thread onto a large metal skewer,** then thread a piece of fish. Repeat until half the zucchini and fish are skewered, then make another skewer with the rest.
  • Season the skewers with salt and pepper, then brush the cilantro marinade all over.
  • Let the fish marinate in the fridge for at least an hour.
  • Preheat a grill to high and remove the skewers from the fridge while it's warming up.
  • Grill the fish over high heat for 6-8 minutes, rotating on all four sides, until the fish is just cooked through.
  • Cut a lemon in half and grill, cut-side down, for the last 4 minutes of grilling.
  • Squeeze some of the grilled lemon over the fish and serve.

Serves two
*I used a mandoline to do this.
**Or soak wooden skewers in water for an hour before using so they won't burn.

Thursday, June 12

Mixed Berry Almond-Oat Crisp

Strawberries and blackberries baked with a crunchy topping of oats and nuts


Mixed Berry Crisp


Even though I've lived in L.A. for most of my life, I'm always discovering new places in the city. My husband and I took our first trip to the Grand Central Market downtown last weekend (primarily to have breakfast here and lunch here) and came home with a bunch of tasty purchases like mole poblano rojo sauce, dried chiles and beans, and fresh produce. We bought everything for cheap, but the fresh fruit we got was a real steal. Some of the vendors sell fruit that's nearly overripe but at a discount that is almost unbelievable. I picked up two pints of strawberries and two pints of blackberries for a total of $2(!) and put them to use in this fruit crisp. The fruit bakes in a hot oven until jammy and bubbling, so it's a perfect way to use up any fruit that's getting to be a little too soft. I switched it up from my usual recipe and added slivered almonds and oats to the crumble topping, which adds body and a slight breakfast-y quality to the dish. Serve it with ice cream for dessert or with a scoop of plain Greek yogurt the next morning.


Related Recipes:
- Peach Raspberry Crumble
- Healthy Oat Pancakes
- Strawberry Crostada


Mixed Berry Almond-Oat Crisp:
  • Preheat the oven to 375F.
  • In a mixing bowl, use a pastry cutter or your hands to work 1 stick of cold, diced butter into 1/2 c. all-purpose flour, 1/4 c. white sugar, 1/4 c. brown sugar, and a pinch of salt until the butter is the size of peas or smaller.
  • Mix in 1/4 c. rolled oats and 1/4 c. slivered almonds until combined. Set topping aside.
  • Slice the tops off of 2 pints of strawberries and halve any large ones.
  • Combine the strawberries with 1 pint of blackberries in a large baking dish and sprinkle the fruit with 1-2 tbsp. of sugar* and 1 tsp. cornstarch.
  • Sprinkle the topping evenly over the fruit and place in the oven.
  • Bake for 25-35 minutes, or until the topping is golden and the fruit is soft and bubbling.
  • Let cool slightly, then cut into slices and serve with ice cream, yogurt, or just enjoy as is.

Serves eight
*Depending on how sweet the fruit is.

Wednesday, June 11

Angel Hair with Roasted Cherry Tomatoes

Sweet cherry tomatoes tossed with capellini pasta, fresh basil, and parmesan cheese 


Angel Hair Pasta with Roasted Cherry Tomatoes


I make a version of this pasta pretty much every year when cherry tomatoes start showing up at our farmers' market. The tomatoes are so sweet and juicy that I don't need to do much to them to make a great tasting dish. In this recipe, I quickly roast the tomatoes with some olive oil and garlic until they are soft and then toss them with delicate strands of angel hair pasta, freshly torn basil leaves, and a shower of grated parmesan. Roasting the tomatoes concentrates their flavor and brings out even more sweetness in the fruit. It's a simple, quick, and easy meal that will make you think you're spending the summer in Italy.


Related Recipes:
- Heirloom Tomato Caprese Pasta
- Spaghetti with Chunky Cherry Tomato Sauce


Angel Hair Pasta with Roasted Cherry Tomatoes:
  • Heat an oven to 400F.
  • Meanwhile, toss 1 pint of cherry tomatoes with 3 tbsp. olive oil, 2 sprigs of fresh thyme, 2 minced garlic cloves, and a pinch of salt in a baking dish.
  • Roast the tomatoes for 20 minutes, or until very soft. Make sure the garlic doesn't burn.
  • While the tomatoes are roasting, bring a large pot of water to a boil and season with salt.
  • Remove the tomatoes from the oven and discard the thyme sprigs.
  • Add 1/2 lb. of dried angel hair pasta* to the pot of water and cook until al dente, about 2 minutes.
  • Drain the pasta, reserving 1 c. of pasta cooking water.
  • Add the pasta and some of the water to the dish of tomatoes and toss to combine.
  • Check for seasoning and add salt as needed and more pasta water to moisten.
  • Garnish with a handful of fresh basil leaves and a sprinkle of grated parmesan cheese.
  • Divide onto plates and serve.

Serves two-four
*Also called cappellini.


Tuesday, June 10

Whole Grilled Snapper with Lemon-Garlic Sauce

Grilling a whole fish is such an easy, elegant, and inexpensive way to entertain


Whole Grilled Snapper with Lemon Garlic Sauce


If you like fish, then I'm here to convince you that grilling it whole is the absolute easiest and most delicious way to make it at home. It can seem intimidating (and kind of disgusting) to clean a whole fish, but any good fishmonger will be able to scale and gut it for you, so all you have to do is season with salt and pepper, stuff with a few slices of lemon and herbs, and throw it on the grill. I used some beautiful whole snapper for this recipe, but use whatever is freshest at your local store. Once your fish is cooked (it takes less than 10 minutes total), just serve it on a platter and pass it around the table so everyone can spoon a few meaty pieces on their plate. But aren't there a lot of bones? Well, yeah. But they're pretty easy to avoid after the fish is cooked, and it's really not a big deal if you accidently get a small bone and have to spit it out. I served the fish with a super garlicky lemon sauce and some grilled baguette, but you could also try it with salsa and tortillas for a Mexican spin.


Other Grilled Fish Recipes:
- Salmon Burgers with Avocado Aioli
- Grilled Swordfish with Eggplant-Pepper Relish
- Mahi Mahi with Grapefruit-Avocado Salsa


Grilled Whole Pink Snapper with Preserved Lemon & Garlic Sauce:
For Sauce
  • Mince 3 cloves of garlic and add to a small pot with 1/4 c. olive oil and 1 crumbled chile de arbol.
  • Turn the heat to medium-low and cook for 2 minutes, or until garlic is fragrant.
  • Stir in the pulp and rind from 1/2 preserved lemon* and 1 tsp. fresh thyme leaves.
  • Cook for another few minutes, making sure the garlic doesn't burn.
  • Transfer to a serving dish and let cool.
For Fish
  • Heat a grill to high.
  • Scale, gut, rinse, and pat dry two 1 1/2 lb. whole pink snappers** and cut off any small side fins.
  • Score the fish with one long lengthwise center cut and a couple vertical cuts on both sides of each fish.
  • Rub the outside of the fish with olive oil and season with salt and pepper, making sure to rub some seasoning into the cuts of the fish.
  • Season the cavities of the fish with salt and pepper and stuff the inside with a few thin slices of lemon and a handful of fresh thyme.
  • Add the fish to the grill and cook for 3-4 minutes, then carefully flip and cook another 3-4 minutes on the other side.***
  • Transfer the fish to a platter and serve with the lemon and garlic sauce.

Serves four-six
*If you can't find or make preserved lemons, you can substitute for the juice of 1/2 lemon, the zest of a lemon, and a large pinch of salt.
**Most fishmongers will do this for you.
***Check to make sure the fish is done by peeking into the center of fish and making sure it is opaque.

Monday, June 9

Grilled Pesto Shrimp Pizza

A fresh, summery pizza made directly on your outdoor grill


Grilled Shrimp Pesto Pizza


I shared the recipe I've been using for homemade pizza dough over a year ago and have been happily baking some great homemade pizzas and flatbreads ever since. But then, in a moment of true nirvana, I tried grilling my pizzas and regular homemade pizza will never be the same for me. The open flame of the grill chars the dough so that it's blackened in spots all over, giving it a smokey wood-burning oven taste that I could never replicate in my normal gas oven. And it cuts down on time! Most thin-crust pizzas bake for about 15 minutes in a hot oven, but grilled pizzas only take about half that time. And no, the dough doesn't stick to the grill at all. Just make sure your grill grates are reasonably clean and lightly brush the pizza dough with oil before grilling.

This pizza has some unusual toppings that I think are perfect for summer: fresh pesto, shrimp, thinly sliced red onion, and melty whole milk mozzarella (the fresh kind that comes packed in water). I buy already cooked cocktail shrimp from the store to save a step, but you could grill it before you make the pizza to double up on the smokey flavor of the dish. It's a fun and unexpected meal to make at your next weekend barbecue and guests (and kids) will love helping to add the toppings to the dough.

Note: If you don't have an outdoor grill, you can assemble all the ingredients on top of the raw dough and bake on a baking sheet in a 425F oven for 15 minutes, or until the cheese melts and the crust is crispy. It will still be tasty.


Related Recipes:
- Whole-Wheat Pizza with Corn & Shishito Peppers
- Asparagus Pizza
- Mushroom Flatbread


Grilled Pesto Shrimp Pizza:
  • Preheat a grill to high heat.
  • Roll out 1 ball of pizza dough on a floured surface until it is approximately 1/4" thick, then brush both sides lightly with olive oil.
  • Thinly slice 1 ball of fresh mozzarella cheese and 1/4 red onion and set aside.
  • Cut 1/4 lb. of peeled and cooked shrimp in half lengthwise and set aside.
  • Cook the dough for 2-3 minutes on the grill, or until crispy and charred in some places.
  • Remove the dough to a cutting board with the cooked side facing up.
  • Spread the dough with 1/4 c. of basil pesto, a layer of mozzarella, the shrimp, and a sprinkle of red onion.
  • Place the pizza back on the grill.
  • Cook with the lid of the grill covered for another 3-5 minutes, or until the bottom is crispy and the cheese has melted.
  • Sprinkle the pizza with 1 c. of loosely packed baby arugula and a pinch of coarse salt.

Serves two-three

Friday, June 6

Brioche with Gruyere, Prosciutto, & Fried Eggs

A decadent open-faced sandwich made with buttery brioche, melted gruyere, prosciutto, and a fried egg


Brioche with Gruyere, Prosciutto, Frisee, and Fried Egg


This decadent open-faced sandwich is one of my favorite things to order at LA's A.O.C. restaurant, so I was thrilled to find the recipe in their cookbook and make it at home. There are only a few ingredients but they are some of my favorites: thickly-sliced buttery brioche bread, nutty gruyere cheese, salty prosciutto ham, and a perfectly fried egg. The sandwich would be very good with all those things alone, but the real restaurant-worthy addition is a fresh and zippy frisee salad with fresh parsley, scallions, and a bit of lemon juice and olive oil. The salad helps to break up all the richness of the cheese and meat and egg and adds a much-needed crunch among all those soft textures. It's a perfectly composed dish that we've been making for brunch the past few weekends. I think it would be equally suited for a quick lunch or dinner and can just as easily be made for one person as it can for eight.


Related Recipes:
- Croque Madame
- Breakfast Bruschetta
- Bacon, Egg, & Cheddar Sandwiches


Toasted Brioche with Gruyere, Prosciutto, Frisee Salad, & Fried Eggs:
  • Preheat the broiler to high.
  • Meanwhile, slice two 1" thick slices of brioche bread and butter both sides of the slices.*
  • In a boil, combine 1 small head of torn frisee lettuce with 1 handful of parsley leaves and 1 thinly sliced scallion.
  • Toss the salad with 2 tsp. lemon juice, 2 tsp. olive oil, and a pinch of salt and pepper.
  • Place the bread on a baking sheet and toast both sides under the broiler until browned.
  • Completely cover the top of each toast with a thin layer of sliced gruyere cheese** and return to the broiler until melted and bubbling.
  • Meanwhile, melt 1 tbsp. butter in a skillet and fry 2 eggs until whites are set and yolks are still runny.
  • Transfer each cheesy toast to a plate and top each with some of the frisee salad and 2 thin slices of prosciutto. Place the fried egg on top of each.
  • Serve immediately.

Serves two, easily doubled
*Brioche is so buttery that it's up to you if you want to butter the bread before toasting it.
**The cheese must cover the entire top of the bread or it will burn under the broiler.

Thursday, June 5

Revisited Recipe: Pork Chops with Blueberry Balsamic Sauce

I have over 700 recipes (and growing) in the Kitchen Sink Diaries archive. Some of them have been tweaked and improved since their original post or were just really special to begin with. These revisited recipes are some of my all-time favorites that deserve a second look.


Grilled Pork Chops with Blueberry Balsamic Sauce


These grilled pork chops with blueberry balsamic sauce just scream summer to me. The sweet and tangy sauce is an interesting and savory way to use in-season berries when you're sick of turning them into sweet pies and preserves. The sauce is good enough that it would pair well with all types of meat and fish, but I especially like to spoon it on top of grilled bone-in pork chops. The meaty chops are simply grilled with salt and pepper until nicely charred on the outside and moist and juicy inside and are a great compliment to the sweet blueberry sauce. It's a restaurant-quality meal that can be put on the table in under thirty minutes and is equally impressive at home on a weeknight, on a camping trip, or at your next dinner party. I've been making this recipe for years and it continues to be one of my favorites.


Grilled Pork Chops with Blueberry Balsamic Sauce:
Ingredients
  • 6 bone-in pork chops, each about 1" thick
  • 2 c. fresh blueberries
  • 2 shallots, minced
  • 2 cloves of garlic, minced
  • 1/2 c. water
  • 2 tbsp. balsamic vinegar
  • 1 tbsp. olive oil
  • 1 tsp. fresh thyme leaves
  • Salt
  • Pepper

Serves six

Wednesday, June 4

Lamb Beef Kofta with Yogurt Sauce

Grilled kabobs made with spiced lamb and beef and served with a cool yogurt sauce


Grilled Lamb Beef Kofta with Greek Yogurt Sauce


I've been seeing kofta, spiced kabobs of ground meat popular in Middle Eastern and Mediterranean cooking, popping up all over the place lately. This is my version that combines lamb and beef with minced onion, fresh herbs, and dried spices. The meat gets shaped into long cylinders, skewered, grilled, and served with a cool yogurt sauce. The flavor is similar to that of a lamb gyro and is great tucked into pita bread or served with couscous or tabbouleh. The meat mixture can even be prepared in advance and kept in the fridge until the grill is ready, making this a great do-ahead dinner for entertaining or busy weeknights. And if you have a well-stocked spice cabinet, the cost of these skewers is super cheap. You'll be grilling these kofta all summer long.


Related Recipes:
- Grilled Lamb Skewers with Feta
- Bahamian Jerk Chicken Skewers with Mango-Avocado Salsa
- Grilled Lamb Sausage with Mixed Green Salad


Lamb Beef Kofta with Dill Yogurt Sauce:
For Sauce
  • Combine 1 c. Greek yogurt, 1/4 c. chopped dill, 1 tbsp. minced preserved lemon,* and a pinch of pepper in a bowl.
  • Refrigerate until ready to serve.**
For Kofta
  • In a mixing bowl, combine 1 lb. ground lamb, 1 lb. ground beef, 1 minced small onion, 2 cloves of minced garlic, 1/2 c. chopped parsley, 1 1/2 tsp. kosher salt, 1 1/2 tsp. pepper, 1 tsp. ground cinnamon, 1 tsp. ground coriander, 1 tsp. ground cumin, and 1/2 tsp. red chile flakes.
  • Mix the meat until well combined, then divide into six even portions.
  • Mold each portion of meat into a long cylinder around a metal or wooden skewer.
  • Refrigerate the meat for at least thirty minutes.
  • Preheat grill to high.
  • Before grilling, brush each kofta with a little bit of olive oil.
  • Grill over high heat for 10-12 minutes, turning every few minutes to hit all four sides.
  • Let cool slightly, then divide onto plates and serve with yogurt sauce.

Serves six
*Can substitute with 2 tbsp. lemon juice and a pinch of salt.
**Sauce can be prepared a day in advance.

Tuesday, June 3

Poached Cherries with Goat Cheese

Sweet and savory poached cherries liven up a cheese plate, grilled meat, and more


A.O.C. Poached Cherries with Goat Cheese


There's a drought in California this year, which means that there's a really short season for fresh cherries. Cherries are available at our farmers' markets now, but the demand and prices are high since they won't be around for long. I made sure to pick up a basketful the other week and used half to make this recipe for poached cherries from The A.O.C. Cookbook (the other half was for snacking). The cherries simmer with orange juice, port, and spices and take on an incredibly complex sweet and spicy flavor. I served them with aged goat cheese and slices of baguette at a weekend barbecue and used the leftovers on top of simple grilled pork chops for a quick weeknight meal. The cherries will keep in the fridge for a few days, so try spooning them over other meats (I think duck would be particularly delicious), cake, and ice cream, too.


Related Recipes:
- Burrata with Persimmon-Pomegranate Relish
- Brie with Honey & Walnuts
- Parmesan Stuffed Bacon-Wrapped Dates


Poached Cherries with Goat Cheese:
  • Make a bouquet garni by wrapping 4 sprigs of fresh thyme, 2 bay leaves, 1 cinnamon stick, 3 star anise, 2 chile de arbol, and 1 tsp. peppercorns in cheesecloth and securing the pouch with twine.
  • Pit 2 c. of fresh cherries and set aside.
  • Meanwhile, bring 1 c. water and 1/4 c. sugar to a boil in a saucepan.
  • Add in 3/4 c. fresh-squeezed orange juice, 1/2 c. port, the cherries, and the bouquet garni and lower to a simmer.
  • Cook for 8-9 minutes, then strain the cherries out and add the liquid back to the pot.
  • Bring the liquid to a boil and reduce by about 2/3.
  • Strain the mixture and set aside to cool.
  • Stir the cherries into the liquid and check for seasoning.
  • To serve, spoon some of the cherries over aged goat cheese and serve with slices of baguette.

Serves six or more (appetizer)

Monday, June 2

Grilled Fava Beans

Grill fava beans in their pods for a simple and rustic side dish


Grilled Fava Beans


It's early June and already summer produce is popping up at our farmers' market. With fava bean season nearly over, I made sure to pick up a couple pounds to enjoy before it was too late. Usually I go through the process of shelling the beans from their pods and then blanch and remove their outer skin before using them, but it's so easy to just throw them on a grill. This is barely a recipe and more of a concept - instead of going through all the prep work, just cook fava beans whole and let your guests shell and eat them like edamame. My friends had no problem eating the whole bean (skin and all), which actually has a starchier, more potato-like taste than peeled beans. It's a fun and unique side dish to serve at your next barbecue, and it's the perfect thing to enjoy on lazy afternoons and evenings when you want to sit around with some drinks and hang out.


More Fava Bean Recipes:
- Fava Bean Crostini
- Roasted Clams with Favas & Sherry
- Crab & Fava Omelet


Grilled Fava Beans:
  • Heat a grill to high.
  • Wash and pat dry 2 lbs. of fava bean pods and cut 1 lemon in half.
  • Grill the fava beans for 3 minutes per side, or until the outsides are nicely charred and about 1/3 of the surface is blackened.
  • At the same time, grill the lemons cut-side down for about 4-5 minutes.
  • Transfer the beans to a platter, squeeze half of a grilled lemon on top, drizzle with extra virgin olive oil, and sprinkle generously with coarse sea salt.
  • To eat, pop the beans out of their pod and enjoy.

Serves four-eight (side dish)