Showing posts with label how-to. Show all posts

Thursday, March 20

How To Make Croutons

Transform stale bread into crunchy salad toppers with this simple recipe


How To Make Homemade Croutons


There are plenty of ways to repurpose leftover and stale bread (french toast, anyone?), but my favorite way is to make croutons. I keep the ends of leftover baguettes and loaves in a big plastic bag in the freezer so that I can whip up fresh croutons any time I need them. The basic idea is to cut or tear the bread into cubes, toss with olive oil, and season. Most of the time I make plain salted croutons, but sometimes I'll add in some fresh or dried herbs, spices, or even a sprinkle of cheese. These homemade croutons taste ten times better than hard-as-a-rock store-bought varieties and can keep fresh in an air-tight container for a couple days. They add the perfect crunch to a salad or as a garnish to a soup and a handful of them makes a nice snack while I'm cooking everything else.


Use Your Croutons in These Salads:
- Arugula, Corn, & Tomato Salad
- Kale Ribbon Salad with Parmesan & Garlic Vinaigrette
- Tricolore Salad with Parmesan & Anchovy


Homemade Croutons:
  • Preheat the oven to 350F.
  • Slice the crusts off a piece of leftover bread* and cut or tear into bite-size pieces.
  • Place the croutons on a baking sheet and toss with a few tbsp. of olive oil, a generous pinch of salt, and a tsp. or more of dried herbs.**
  • Use your hands to gently squeeze the croutons so that they absorbs more oil, then shake them into an even layer on the baking sheet.
  • Bake the croutons for 10-15 minutes, turning once, or until they are crispy and golden.
  • Let cool, then toss into salads and serve or store in an airtight container.

Make as many as you want
*I usually use a leftover baguette or ciabatta. You can use fresh bread, but it might take longer for the croutons to get crispy.
**The exact amount of oil and seasonings depends on how much bread you use. Taste and adjust as you go.

Monday, January 6

How To: Roast Vegetables in the Oven

The foolproof method for perfectly roasting vegetables in the oven

Oven Roasted Broccoli


Perfectly roasted vegetables are one of my go-to recipes during the week because they're so simple and can be used in endless ways. Once you master the method of roasting one type of vegetable in a hot oven, you can easily use the same technique on any other vegetable that you like and just adjust the cooking time as needed. The key is making sure that all vegetables are the same size and that your oven is very hot. This ensures that everything is done at the same time and that the vegetables get crunchy and browned in some areas. The difference between steamed or blanched broccoli and roasted broccoli is incredible - the high heat from the oven adds a toasty, nutty flavor to the florets that can't be achieved with other methods. Serve the vegetables on their own for a quick and healthy side dish or turn them into a vegetarian meal with just a few extra steps.


Ideas for Turning Roasted Vegetables Into a Meal:
- Fold into tortillas and top with cheese and salsa for quick vegetable tacos.
- Toss with a hearty grain like quinoa or farro for a substantial lunch salad like this and this.
- Stir them into pasta sauce and serve over whole-wheat noodles for an easy pasta primavera.


Perfect Oven-Roasted Vegetables:
  • Preheat your oven to 425F.
  • Chop vegetables into uniform bite-size pieces.*
  • Toss each bunch of vegetables with 2 tbsp. olive oil and generous sprinkle of kosher salt and pepper and arrange in a single layer on a baking sheet.**
  • Roast in the oven for 8-10 minutes, or until tender and browned in some areas.

Serves two-four (side dish per bunch of vegetables)
*Smaller vegetables, such as asparagus spears and baby carrots, can be left whole.
**Do not crowd vegetables on the sheet or they will steam instead of getting brown.


Cooking time varies by vegetables.
- Broccoli and cauliflower florets, halved brussels sprouts, and similar vegetables generally take 8-10 minutes.
- Thin asparagus, small carrots, and other long skinny vegetables can take as little as 5 minutes.
- Diced potatoes and winter squash can take 20-30 minutes or longer, depending on size.
- Eggplant and summer squash usually take 10-15 minutes.

Monday, March 11

How To: Poach an Egg


I've mastered the fried egg (see here), but sometimes a poached egg is just better. The only problem is that they're so much harder to make. Whenever I try to poach one, I get it right about 20% of the time and end up wasting a bunch of eggs and getting in a bad mood. I thought I had tried all the tricks, but this article and video from Serious Eats encouraged me to try again. The key is to use the freshest eggs you can find (I got mine from the farmers market) and strain out the loose watery whites that spread out in the pot and cloud the water. You'll be left with a thick white and yolk that stays in tact and holds its shape. This weekend I made four poached eggs and they all turned out perfectly - egg-shaped, no weird floating whites, and a liquid gold center. It made for a perfect breakfast over some buttered toast and sprinkled with coarse sea salt, but try this, this, or this, for something more substantial.


Poached Eggs:
  • Fill a saucepan with a water and heat until barely simmering.*
  • Crack eggs, one a time, into a small bowl or ramekin.
  • Transfer eggs, one at at time, into a fine mesh strainer and gently swirl to allow the very liquid whites to fall through.
  • Carefully submerge egg and strainer into the pot of water and gently jiggle the egg out into the pot.
  • Cook for 2-3 minutes, using a slotted spoon to turn the egg every minute or so to evenly cook.
  • Remove the egg with a slotted spoon and place on a power towel to drain.
  • Season with salt and pepper.
  • Repeat with remaining eggs.**

*The water should just have a few small bubbles at the bottom of the pot.
**You should be able to poach 4-5 eggs in the same water. Poached eggs can also be immediately transferred into cold ice water and kept in the fridge for a few days. To heat, gently place eggs in hot water for 2-3 minutes.


Friday, August 24

How To: Grill Corn


I eat corn a few times a week during the summer, usually opting to sauté it with whatever other veggies or herbs I have on hand or throw it in a salad or pasta. The approach is still quick and satisfying but sometimes it’s nice to keep things as simple as possible. Grilling the corn and eating it straight off the cob is summer dining at its finest and always gives me a nostalgic feeling of the easiness of being a kid on summer break. There are many ways to cooking corn on a grill (in their husks, soaked in water, etc.) but I find that brushing them with a little oil and putting the bare ears directly on the hot grates works perfectly. Plus, I love the smoky charred flavor that some of the kernels get from this method. Sprinkle with a little salt and enjoy as is – or if you must get fancy, top with a garlic herb compound butter.


Grilled Corn on the Cob:
  • Remove the husks and silks from the corn and discard.
  • Lightly brush the corn with canola oil and place directly on a hot grill.
  • Cook for 7-10 minutes, turning and rotating it evenly every 3 minutes or so.
  • Remove from the grill and enjoy.

Wednesday, July 25

How To: Steam A Lobster


Even though I have a ton of pride for the west coast (best coast), every summer I dream about spending time in New England. Most of this fantasy comes from that knowledge that lobsters are dirt cheap in certain areas, and I love the idea of spontaneously pulling up to a road side stand, buying a few, and cooking them for dinner. Luckily my favorite local seafood store gets tons of live lobsters shipped to them so I can still live out a portion of this dream at home. We cooked some this past weekend in my favorite simple preparation: steamed, cracked, and served with a lot of melted butter.


Steamed Lobster:
To Cook
  • Bring 1" of water to a rapid boil in a large pot, add in 2 live lobsters,* and cover with a lid.
  • Cook for 15 minutes, or until the lobsters turn bright red.
  • Remove from the pot and let cool slightly.
To Crack
  • Pull the tails off, crack the shell, and pull out the meat in one large chunk. Slice.
  • Pull the legs off and use a rolling pin to roll the meat up and out of the shell.
  • Pull the claws off, remove the meat from the knuckles, then crack the claw shell and pull out the claw meat in one piece.**
  • Serve with melted butter and lemon wedges.

Serves two - four
*About 1 1/2 lbs. each.
**I saved the shells and bodies to make a lobster stock with.

Thursday, April 26

How To: Grill a Steak


We’re lucky enough to grill year-round in L.A., but for most people barbecue season has just arrived. The king of all grilled meats is a steak, so I thought it fitting to provide some insight on how to get it perfectly cooked every time. It doesn’t matter if you use a premium gas grill or a standard charcoal one, the most important thing is to be patient and choose a quality piece of meat. This recipe uses a rib-eye (my personal favorite) and is cooked to medium, but you can certainly use your favorite steak and adjust the doneness to your liking. A good steak only needs some salt and pepper, but more power to you if you want to add your favorite rub, sauce, or compound butter (I love blue cheese crumbles, chimichurri sauce, or garlic-herb butter).


Perfectly Grilled Rib-Eye Steak:
  • Brush a 1 lb. steak with olive oil and generously season with salt and pepper.
  • Let steak sit out at room temperature for an hour* and pre-heat your grill to high 15 minutes before cooking.
  • Place the steak on the grill, cover with the lid, and cook for 5 minutes.
  • Turn** and cook for another 5 minutes, then remove to a plate.
  • Cover the plate loosely with tin foil and let rest for 10 minutes.***
  • Slice steak and serve.

Serves two
*This step is crucial because it allows the steak to cook evenly.
**Resist the urge to check on the steak and flip it multiple times. By only flipping once, the steak will get a chance to caramelize on the outside.
***Be patient. Allowing the steak to rest causes the juices to re-distribute into the meat.


Tuesday, January 24

How To: Cook & Peel an Artichoke


I came across some gorgeous artichokes at the farmers’ market this past weekend and couldn’t resist taking a few home with me. Fresh artichokes are a real treat and so much different than the canned or frozen versions you find most places. Large ones are best steamed and make a great appetizer or side dish. I like to peel off the leaves and dip them in tzatziki sauce, but my favorite part is the heart, which I like to slice and eat with lemon and melted butter. The whole process is a bit involved, so it's a great thing to make on a lazy night where you can watch a movie while sitting around and dissecting the artichokes.

Steamed Artichokes:
  • Cut most of the stem off of 4 large artichokes so that each artichoke can stand upright, and slice 1/4"-1/2" off of the top of each.
  • Pull off any cracked or bruised outer leaves, then use a pair of kitchen shears to cut the sharp edge off of each outer leaf.
  • Place the artichokes, stem side down, into a large pot and fill with 2-3 c. of water.*
  • Cover the pot and cook over medium heat for 35-45 minutes, or until a knife can easily slide into the steam of each artichoke.
  • Remove the artichokes from the pot and cool for 10 minutes.
  • Peel off the outer leaves and serve with tzatziki sauce or melted butter for dipping.
  • Once all the outer leaves have been eaten, remove all the interior ones and discard.
  • Use a spoon to scrape out the hairy choke in the center,** so you will be left only with the heart.
  • Slice the heart and serve with melted butter and a squeeze of lemon.

Serves four - eight (appetizer or side)
*Or enough to cover about 1" of the pot. Check back after about 30 minutes to make sure that all the water hasn't evaporated.
**This part is completely inedible.

Friday, January 6

How To: Make a Vinaigrette


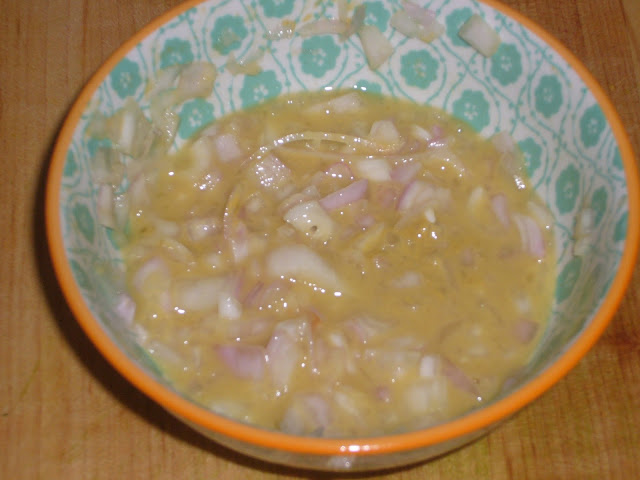
I've been playing around with my go-to salad dressing recipe and finally hit on the perfect one. It's so easy and cheap to make that there's no reason to buy a bottled version and it's a healthier alternative to store-bought anyway. The basic idea is simple: mustard, acid, oil, salt and pepper in a certain proportion - but the combinations you can make from that are seemingly endless. My latest favorite is this lemon and shallot version, but sometimes I like to add fresh minced herbs to it also. Add it to some wild arugula and shaved Pecorino and you have a side dish that takes less than five minutes to make. Or get creative and swap out the lemon for balsamic or rice wine vinegar and the shallots for minced garlic or grated ginger.

Lemon & Shallot Vinaigrette:
  • Combine 1 tsp. Dijon mustard with the juice of one lemon.
  • Add in 1 diced shallot and let stand at room temperature for 10 minutes.*
  • Slowly whisk in 2 1/2 - 3 tbsp. extra virgin olive oil** and season with salt and pepper.

Good for one large salad
*The lemon juice will mellow the raw shallot taste. However, you don't have to wait if you're in a time crunch.
**This is the time to use really high-quality extra virgin olive oil.

Tuesday, November 15

How To: Make Chicken Stock


If you’ve ever had homemade chicken stock, you know that it’s significantly more delicious than the store-bought stuff. I usually stick with the store-bought variety out of laziness, but in reality it doesn’t take much effort to make my own. There are two ways to make it: brown various – and sometimes unsightly – chicken pieces and vegetables in a large pot, then cover with water and simmer for hours (this is how I make the base of chicken tortilla soup) or take the carcass from a leftover roasted chicken and simmer it in water for hours. I used the carcass method because I had one lying around from this meal and because it’s the easiest way. Freeze the stock in resealable containers and use it to make soup, risotto, polenta, etc. The exact same recipe can also be used to make turkey stock with your Thanksgiving bird.

Homemade Chicken Stock:
  • Add the carcass of a 5 lb. chicken into a pot and cover with water.
  • Bring to a boil, then lower the heat and simmer for 3 hours, or until concentrated.*
  • Remove the carcass and strain the stock. Discard any solids.
  • Return the stock to the pot and continue simmering for another 1-2 hours, or until reduced.
  • Divide into resealable, freezer-proof containers.**

Makes eight - ten cups
*Check on the stock and skim the top every once and awhile.
**Stock can be kept in the freezer for 6 months.

Thursday, September 15

How To: Mash Potatoes


Mashed potatoes are something that everyone loves to eat, but many home cooks have trouble perfecting this dish. We've all had lumpy, gummy, bland mashed potatoes, so I'm hoping this latest "how to" will shed light on how to get perfectly smooth, creamy mashed potatoes every time. You do need a few special tools to cook this, but it's totally worth it. First I use a great vegetable peeler (also helpful for creating ribbons of Parmesan cheese or chocolate shavings) and then I use a masher to pulverize the cooked spuds (using a potato ricer or food mill is even better). This recipe sticks to the basics, but it can easily be jazzed up by adding roasted garlic, sour cream, cheddar cheese, etc.


Perfect Mashed Potatoes:
  • Peel the skins off two large potatoes* and dice into small, uniform pieces.
  • Place potatoes into a pot and cover with cold water.
  • Place a lid on the pot and bring water to a boil. Continue cooking potatoes until tender, about 20 -25 minutes.
  • Drain all water from the potatoes, place back in the pot, and place the pot over low heat.**
  • Let the potatoes dry over the flame for a minute or two.
  • Meanwhile, heat a small saucepan with 3 tbsp. unsalted butter and 1/2 c. heavy cream until butter melts.
  • Add cream mixture into the potatoes, a little at a time, then mash them into a smooth puree.
  • Continue adding the cream until you've achieved the right consistency.
  • Season potatoes with salt and pepper and serve immediately.***

Serves two-four (side dish)
*Russet and Yukon Golds are my favorite here.
**This step is essential to burn off any excess liquid and stops potatoes from being gummy.
***If waiting to serve, cover with a lid. Gently reheat over a low flame, adding extra cream as necessary.

Friday, August 19

How To: Fry An Egg


While I love to express my creativity through my food and often create or recreate gourmet dishes, you can't be a good cook without understanding the basics. This new "How To" segment aims to share tricks for perfecting certain cooking techniques that I use all the time. It amazed me to find that one of my most popular entries to date has been about roasting bacon in the oven, but it makes sense since it's a dish people cook all the time. Same thing goes with frying an egg, since it can be tricky to achieve getting a crispy bottom while keeping the yolk soft and unctuous. Serve the eggs with said bacon, or place on top of salads and sandwiches for a gourmet touch.

Crispy Fried Eggs:
  • Melt 1 tbsp. butter in a medium-size skillet over medium-high heat.
  • Crack two eggs in the pan, spacing far enough apart so they don't stick together. Season with salt and pepper.
  • Place a larger skillet upside down over the skillet with the eggs.*
  • Cook eggs for 2 minutes, then uncover the pan.
  • Use a spatula to plate eggs. Serve with hot sauce.

Makes two eggs
*The larger skillet will act as a lid, which will cause the top of the eggs to steam while the bottom gets crispy.


Friday, July 1

Kitties' Birthday Party

Huckleberry's Strawberry & Carrot Cake Cupcakes

Anyone who knows me will tell you that I am in love with my two kitties, Chip and Ralphie, a brother and sister pair that I found on Craigslist a couple years ago. To celebrate their second birthday, I treated them to grilled shrimp and a slew of new toys. For the humans, I got cupcakes from Huckleberry (previously reviewed here). It was such a fun night, and a great way to celebrate the love and joy that they've brought me these past two years.

Perfectly Grilled Shrimp:
  • Toss 3/4 lb. peeled and de-veined shrimp with 1 tbsp. olive oil, sea salt, and pepper.*
  • Cook over a hot grill for 2-3 minutes per side, or until shrimp turn opaque.
  • Let rest for 5 minutes before eating.**

Serves two
*If making food for your pets, do not add seasoning, this can upset their stomachs.
**If feeding to pets, cut into very small pieces, and limit the portion to 1 shrimp per cat.

Ralphie (left) & Chip (right)

Thursday, April 14

Maple Glazed Bacon

Breakfast just got a serious makeover with this sweet and salty oven-roasted bacon


Oven Roasted Maple Bacon Barefoot Contessa


There aren’t many things more delicious than a perfectly cooked piece of bacon, but standing over a skillet and getting spritzed with hot grease can be an unpleasant experience. I’ve been using an adaptation of this recipe for Ina Garten’s maple roasted bacon, and it makes cooking bacon so much easier! It’s especially helpful when making breakfast for a large crowd because you don’t have to watch over multiple skillets or cook the bacon in batches. If you're in a pinch and don’t have maple syrup, try sprinkling 1 tsp. of brown sugar over each piece during the last five minutes of cooking.


Maple Roasted Bacon:
  • Preheat the oven to 400°F.
  • Cover a baking sheet with aluminum foil and place a baking rack on top.
  • Arrange 8 pieces of thick-cut bacon in a single layer on the baking rack and place in the oven.
  • Cook for 15-20 minutes, or until starting to crisp.
  • Remove the bacon from the oven and brush each piece with pure maple syrup.
  • Place back in the oven and cook another 5-10 minutes.
  • Immediately remove bacon from the baking rack* and drain on paper towels before serving..

Makes 8 pieces of bacon, can easily be doubled or tripled
*If you let bacon cool on the rack, it will stick and be impossible to remove in one piece.